This post is about two things: public epistemology, and pie.
(Yes, there is a recipe for Key lime pie, down near the end of the post. You can skip to the recipe if that’s all you’re here for!)
Contents
“What’s so great about your new X?”
A recent comment I wrote on another forum described how to convince people of the value of a technique. Read the comment for details, but the short version is: display something which you made by using the technique. If the thing is clearly cool, then the technique recommends itself—“by their fruits ye shall know them”.
But what if the technique is a meta-technique? That is, what if the things you make with it are themselves techniques? A technique is not obviously cool, that being our original problem…
Again the solution is simple: go down another level. Display some cool thing you have made or done, using a technique which you have made by using the meta-technique. Thus the first-order technique recommends itself by its product; and the second-order technique recommends itself by its product, which is the first-order technique.
(Thus you should never have to say anything like “but the things that this technique makes are intangible, so how can I show them to you?”.)
That’s the claim, anyway; but maybe you think I ought to put my money where my mouth is? Well, indeed; and thus, this post.
Now I’m going to switch gears and talk about pie.
This section starts with a picture of a pie
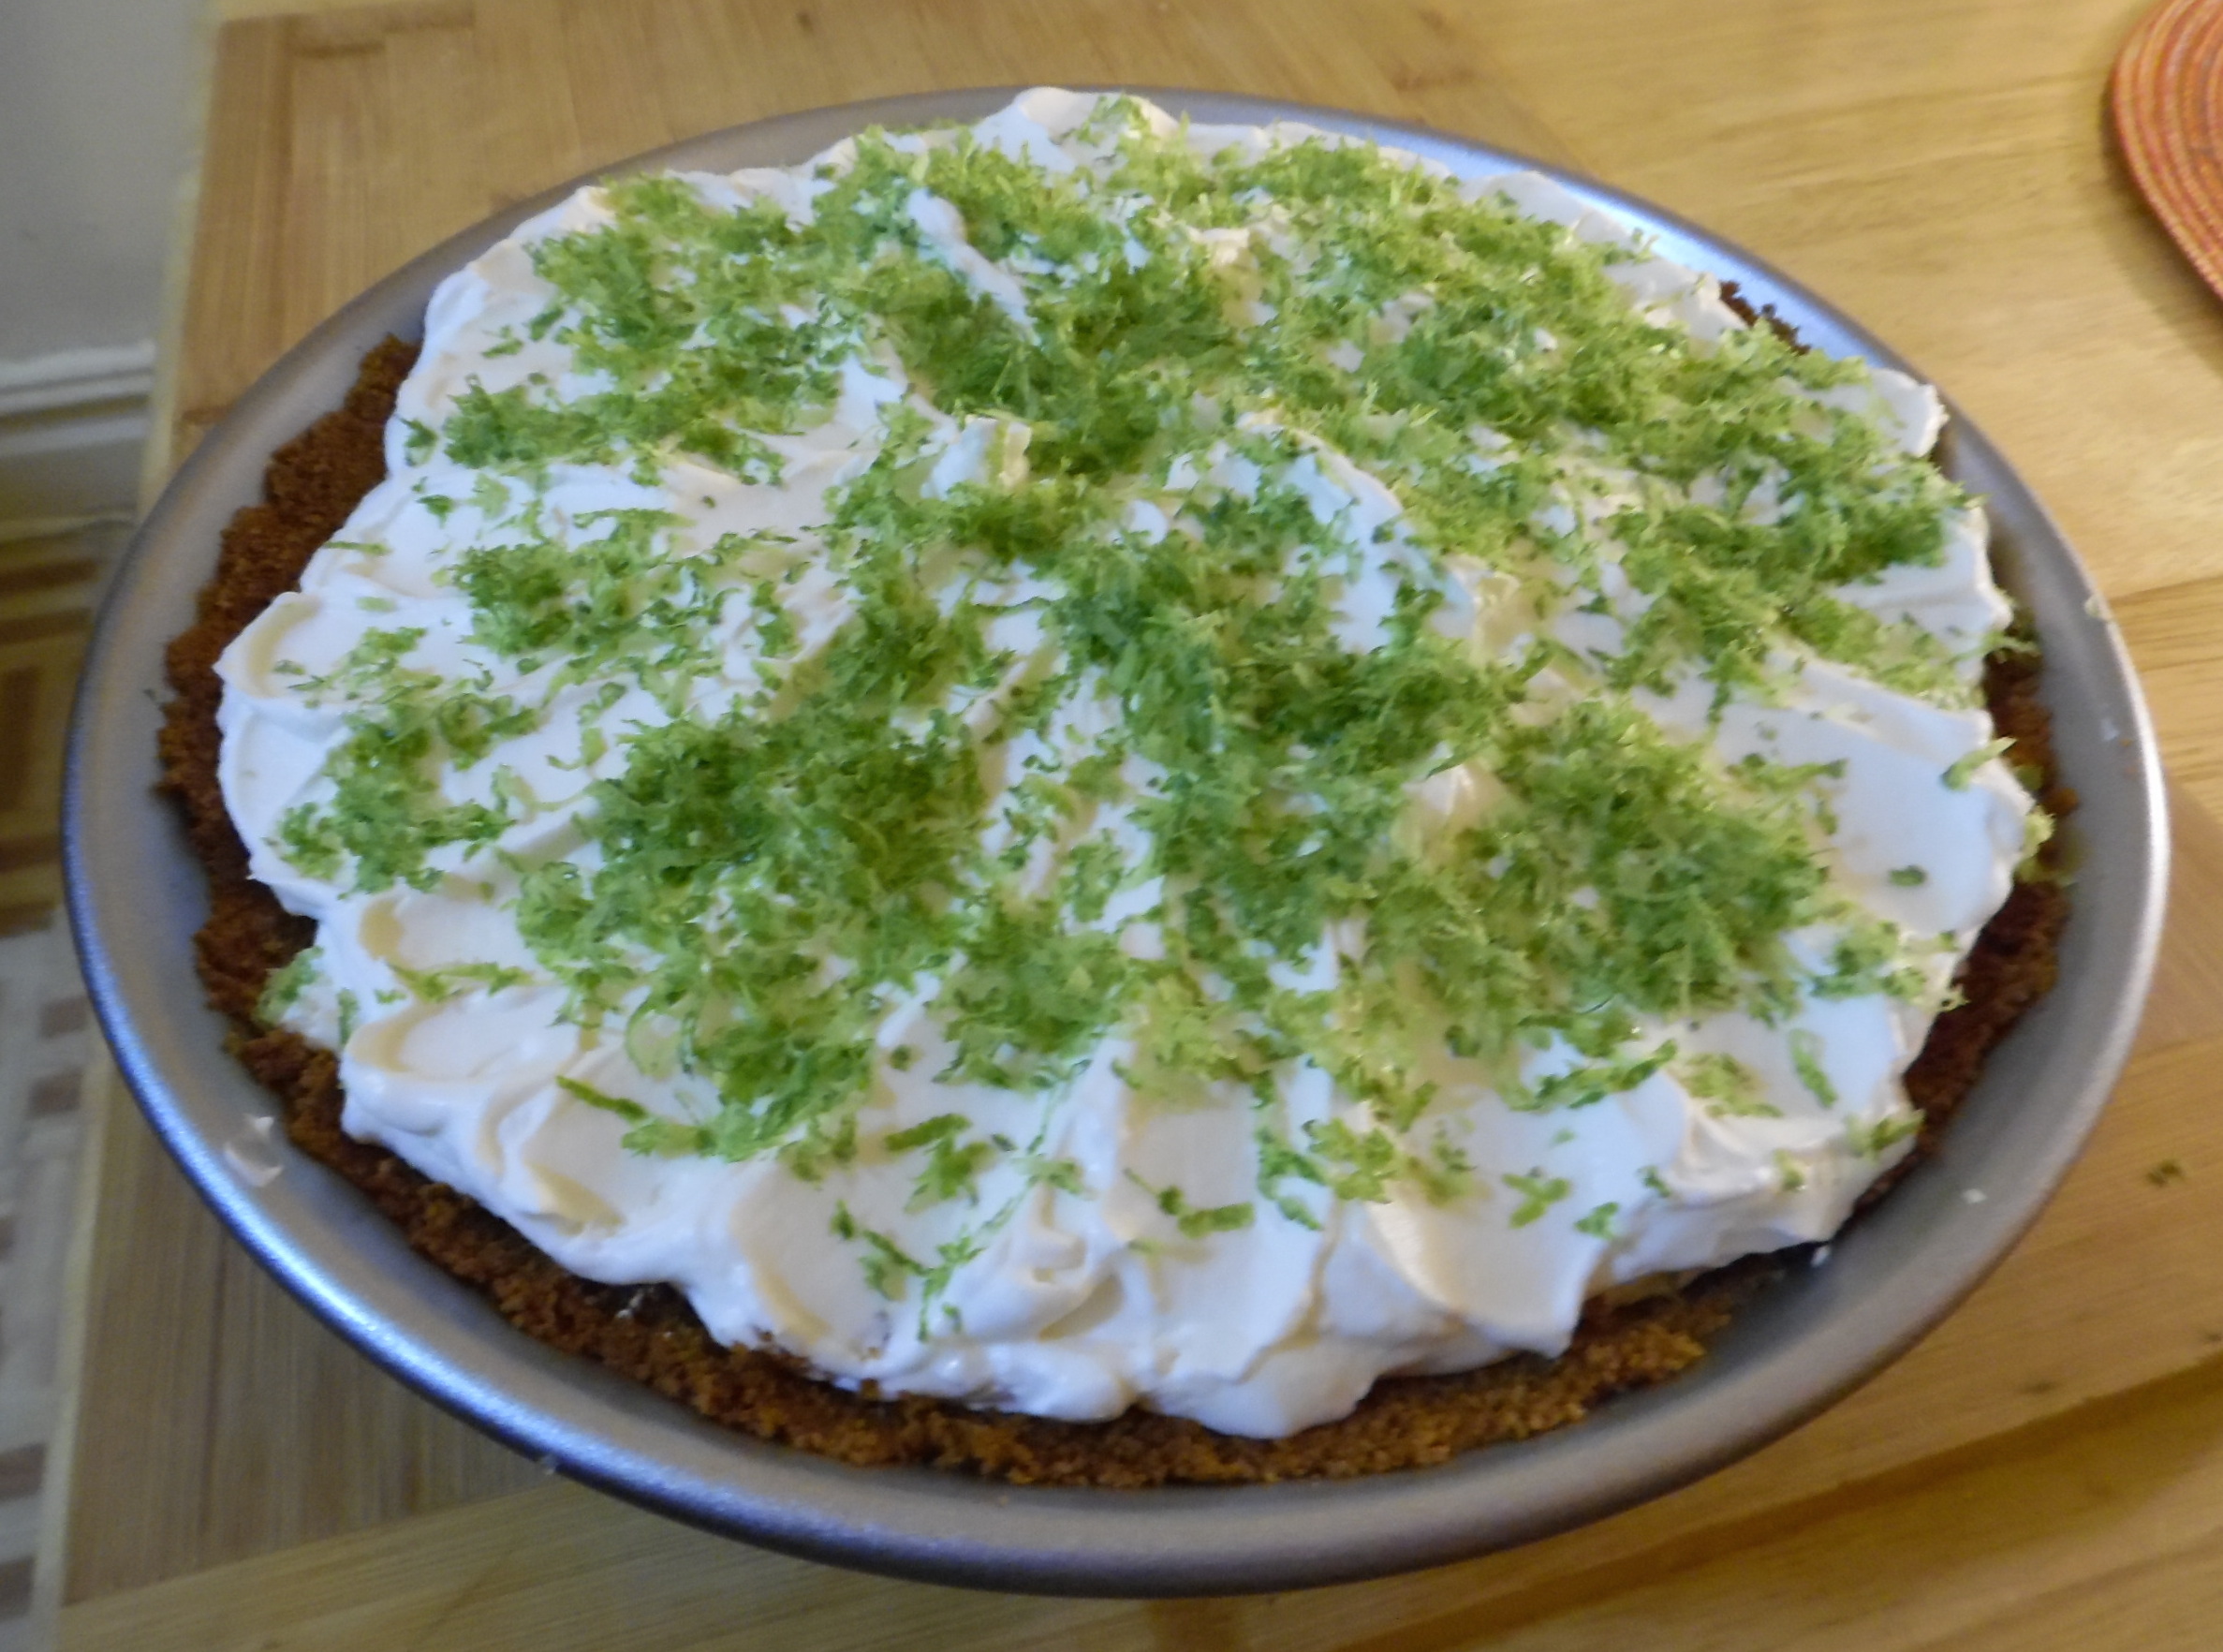
The garnish is lime zest.
(click to enlarge)
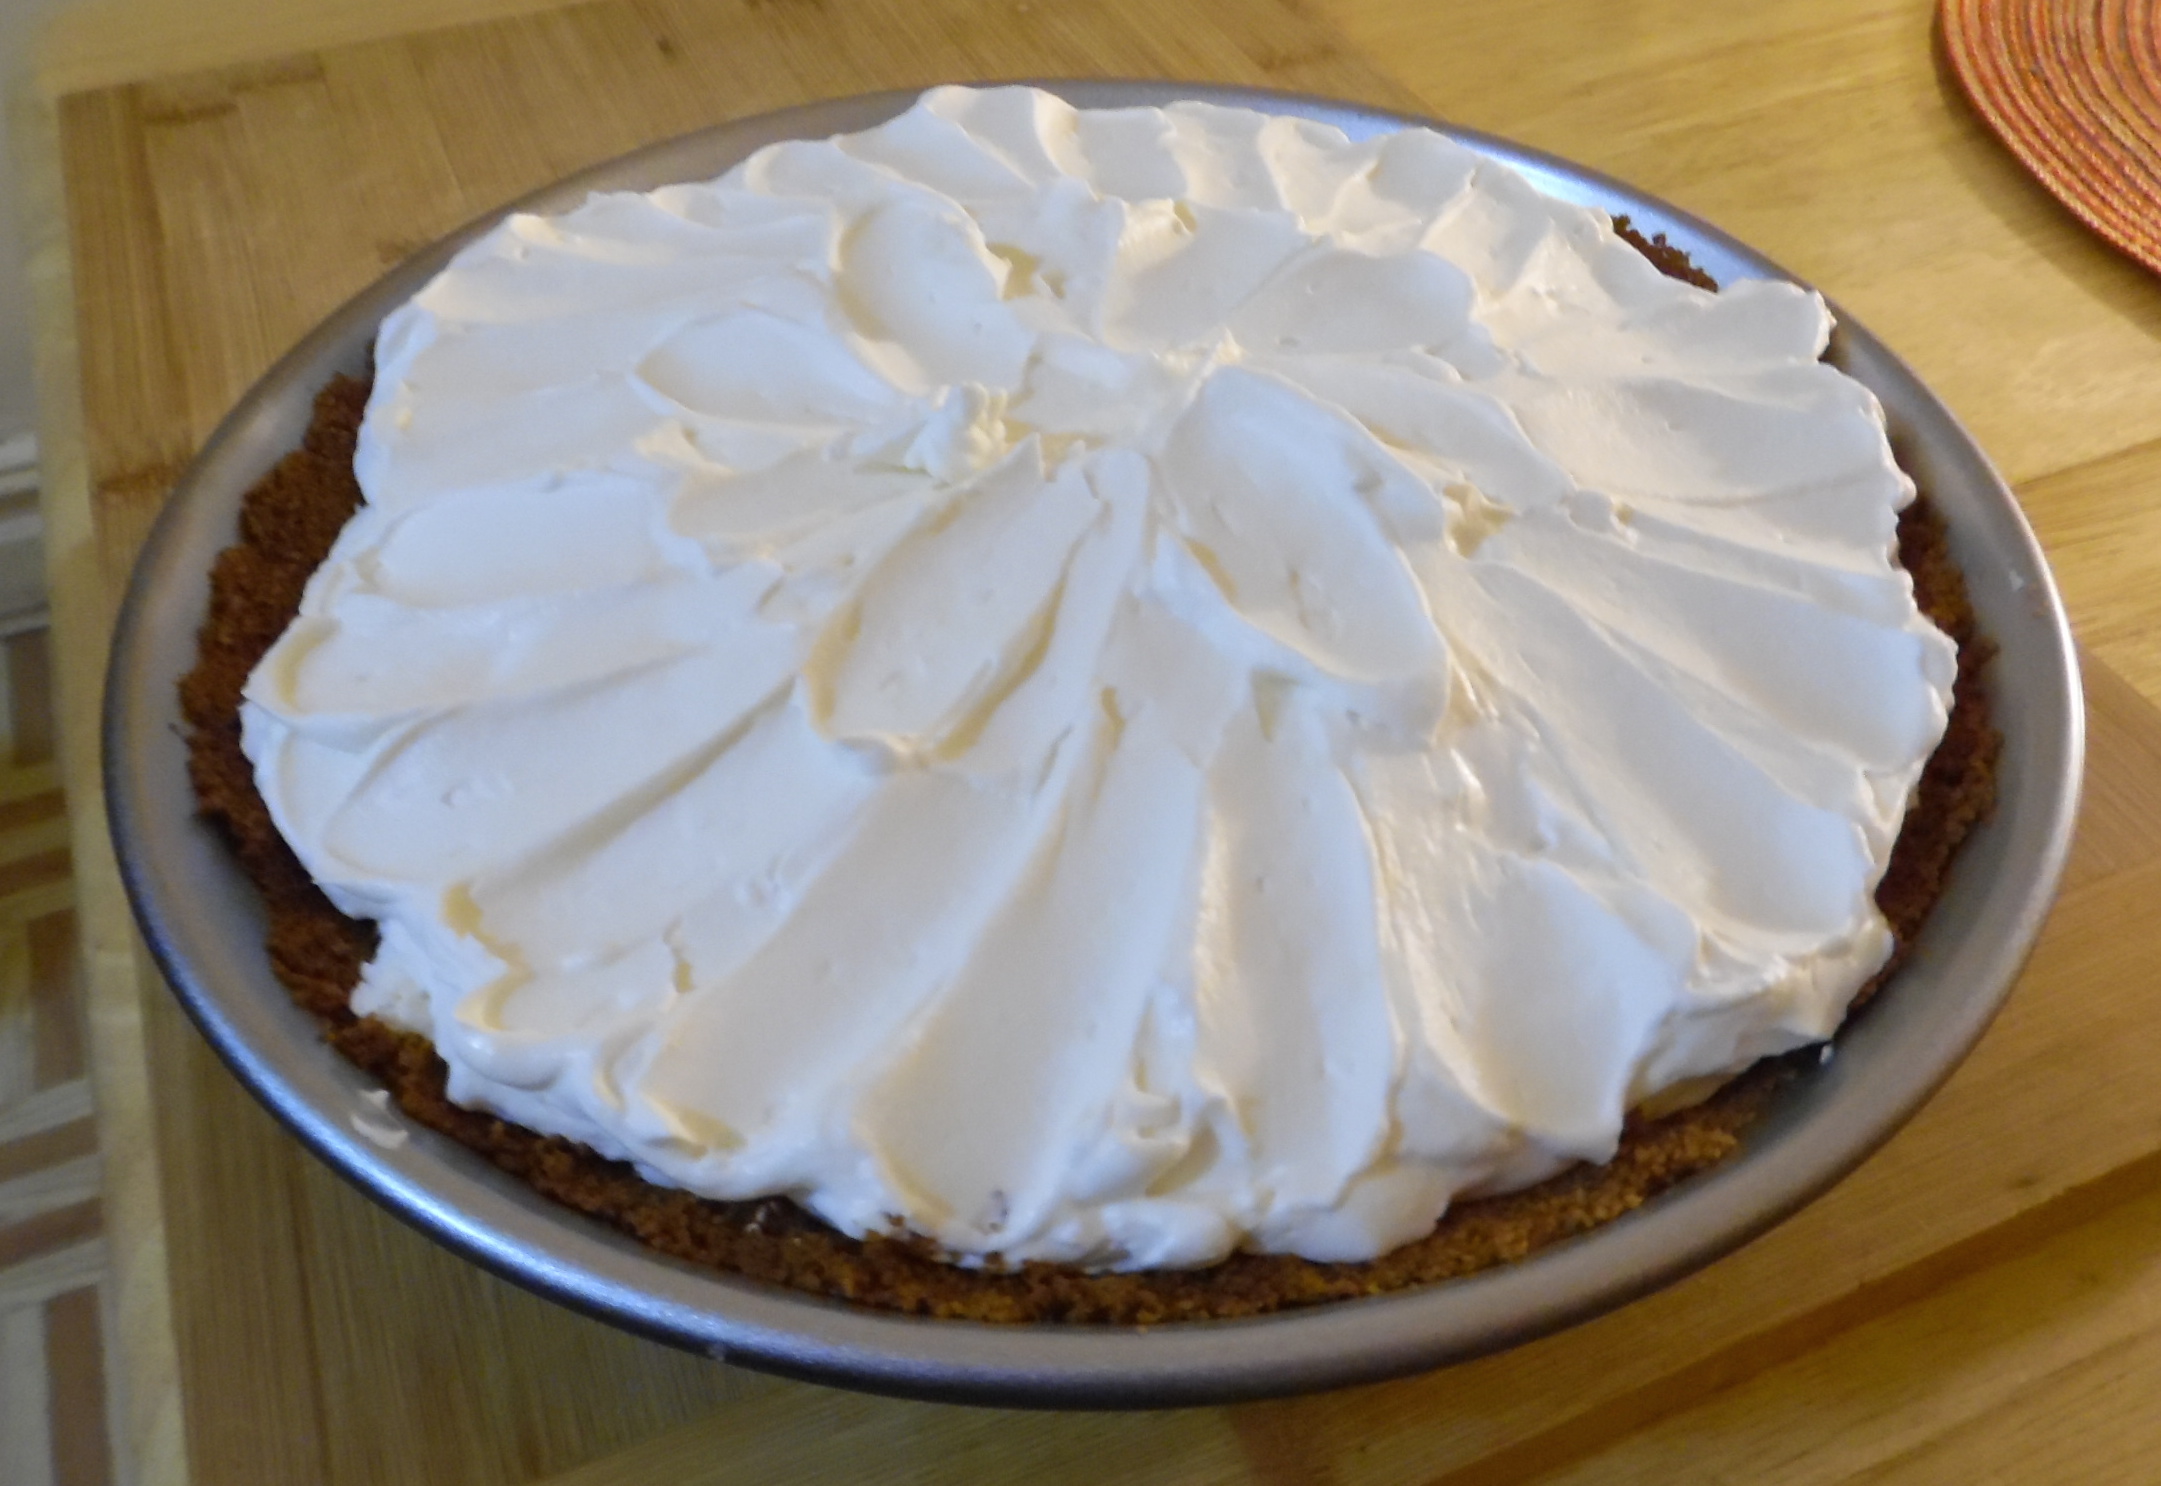
That’s the pie. I made it, today. It’s delicious, and was quite easy to make.
Some more pictures:
 Pie with slice removed
 The first slice
To make a Key lime pie, you need a recipe for Key lime pie. But there are many recipes; how do you choose among them? (Do you choose? Is inventing your own recipe an option? But how do you do that?)
Later on in this post, I’m going to talk about how I made the pie (i.e., I will provide the recipe). First, though, I’ll tell you how I formulated the recipe (I didn’t just use a recipe I found somewhere!). But before that, I’ll tell you how I came up with the technique which I used to formulate the recipe.
You read that right: I propose to take you on a journey up and down fully three levels of meta. (And all for pie! Is it worth it? Yes. Yes it is.)
SDI: Not just for shooting down Soviet missiles

Pictured: not a Key lime pie.
Alicorn of Less Wrong described the “Saturation, Distillation, Improvisation” approach to developing procedural knowledge. (She, too, used it to come up with a cookie recipe. Coincidence? Or proof that dessert-baking is the most rational activity?)
SDI has three steps. Quoting/paraphrasing the key parts:
- “[C]ollect procedural instructions for the object of your search from many different people, saturating your field of search with a variety of recommendations.”
- See what the instructions have in common, and also determine whether to include any non-common elements.
- Try out the resulting procedure, then experiment with variations on it.
So that’s the meta-meta-technique. I’m going to take the SDI framework, and refine it into a more concrete, more systematic form. This meta-technique is one which I’ve applied before (I used it to develop a killer brownie recipe, for example, and use an abbreviated form of the technique often when experimenting with recipes); today we’re going to apply it to Key lime pie.
The pie matrix (saturation)
I pulled a bunch of Key lime pie recipes off the internet. No special method was used to collect these; I just clicked on most of the first page of search results (making sure to include reputable sites like Serious Eats, and widely-used ones like Allrecipes).
Because Key lime pie consists of three components—the crust, the filling, and (optionally) the topping—which are mostly independent in terms of preparation (and thus, which it should be possible to optimize separately), I also included the graham cracker crust recipe from Christopher Kimball’s Dessert Bible (which I have used, to good effect, in many other recipes).
I put all the recipes into a table (a spreadsheet ), for easy comparison.
| Serious Eats | Allrecipes.com (a) | Food Network | Simply Recipes | The Pioneer Woman | Allrecipes.com (b) | The Dessert Bible | |
| Ingredients, crust | |||||||
| Graham crackers | 10 | 91 | 9 | 183 | 11 | ||
| Salt2 | 1⁄2 tsp | ||||||
| Sugar | 3 tbsp | 1⁄3 cup (5.3 tbsp) | 3 tbsp | 1⁄3 cup (5.3 tbsp) | 3 tbsp (brown) | ||
| Butter | 5 tbsp | 5 tbsp | 4 tbsp | 1⁄3 cup (5.3 tbsp) | 5 tbsp | ||
| Ingredients, filling | |||||||
| Sw. cond. milk | 14 oz. | 14 oz. | 14 oz. | 14 oz. | 14 oz. | 24 oz.6 | |
| Egg yolks | 4 | 5 | 3 | 3 | 2 | ||
| Lime juice | 4 oz. | 4 oz. | 2⁄3 cup (5.3 oz.) | 4 oz. | 4 oz. | 6 oz. | |
| Lime zest | 1 tbsp | 2 tsp | 1 tbsp | 1 tbsp | 1 tbsp | ||
| Sour cream | 1⁄2 cup | ||||||
| Ingredients, topping | |||||||
| Heavy cream | 6 oz. | 8 oz | 6 oz. | 8 oz.4 | |||
| Confec. sugar | 2 tbsp | 2 tbsp | 1 tbsp | 2 tbsp | |||
| Mascarpone | 1⁄4 cup (opt) | ||||||
| Vanilla extract | 1⁄8 tsp | ||||||
| Process | |||||||
| Crust chilled? | 15 min. | no | no | no | no | no | 20 min. |
| Crust bake temp. | 375°F | unbaked | 350°F | 350°F | 350°F | unbaked | 350°F |
| Crust bake time7 | 10 min. | unbaked | 8 min. | 10 min. | 5 min. | unbaked | 15 min. |
| Filling bake temp. | 325°F | 375°F | 350°F | 350°F | 350°F | 350°F | |
| Filled pie bake time8 | 14 to 17 min. | 15 min. | 10 min. | 10 min. | 15 min. | 5 to 8 min. | |
| Pan size | 8″ springform | 9″ pie dish | 9″ pie dish | 9″ pie dish | 9″ pie dish5 | 9″ pie dish | 8″ or 9″ pie dish |
| Misc. | Freeze before serving |
(All measurements have been normalized.)
Compare & contrast (distillation, part I)
I’ll do the ‘distillation’ step in several parts: I’ll examine, separately, what the recipes say about the ingredients for the crust, the filling, and the topping. If the recipes differ in any other ways (such as in the parts of the preparation process that aren’t separable, e.g. in how to assemble the components), I’ll note that as well.
Ingredients
Crust
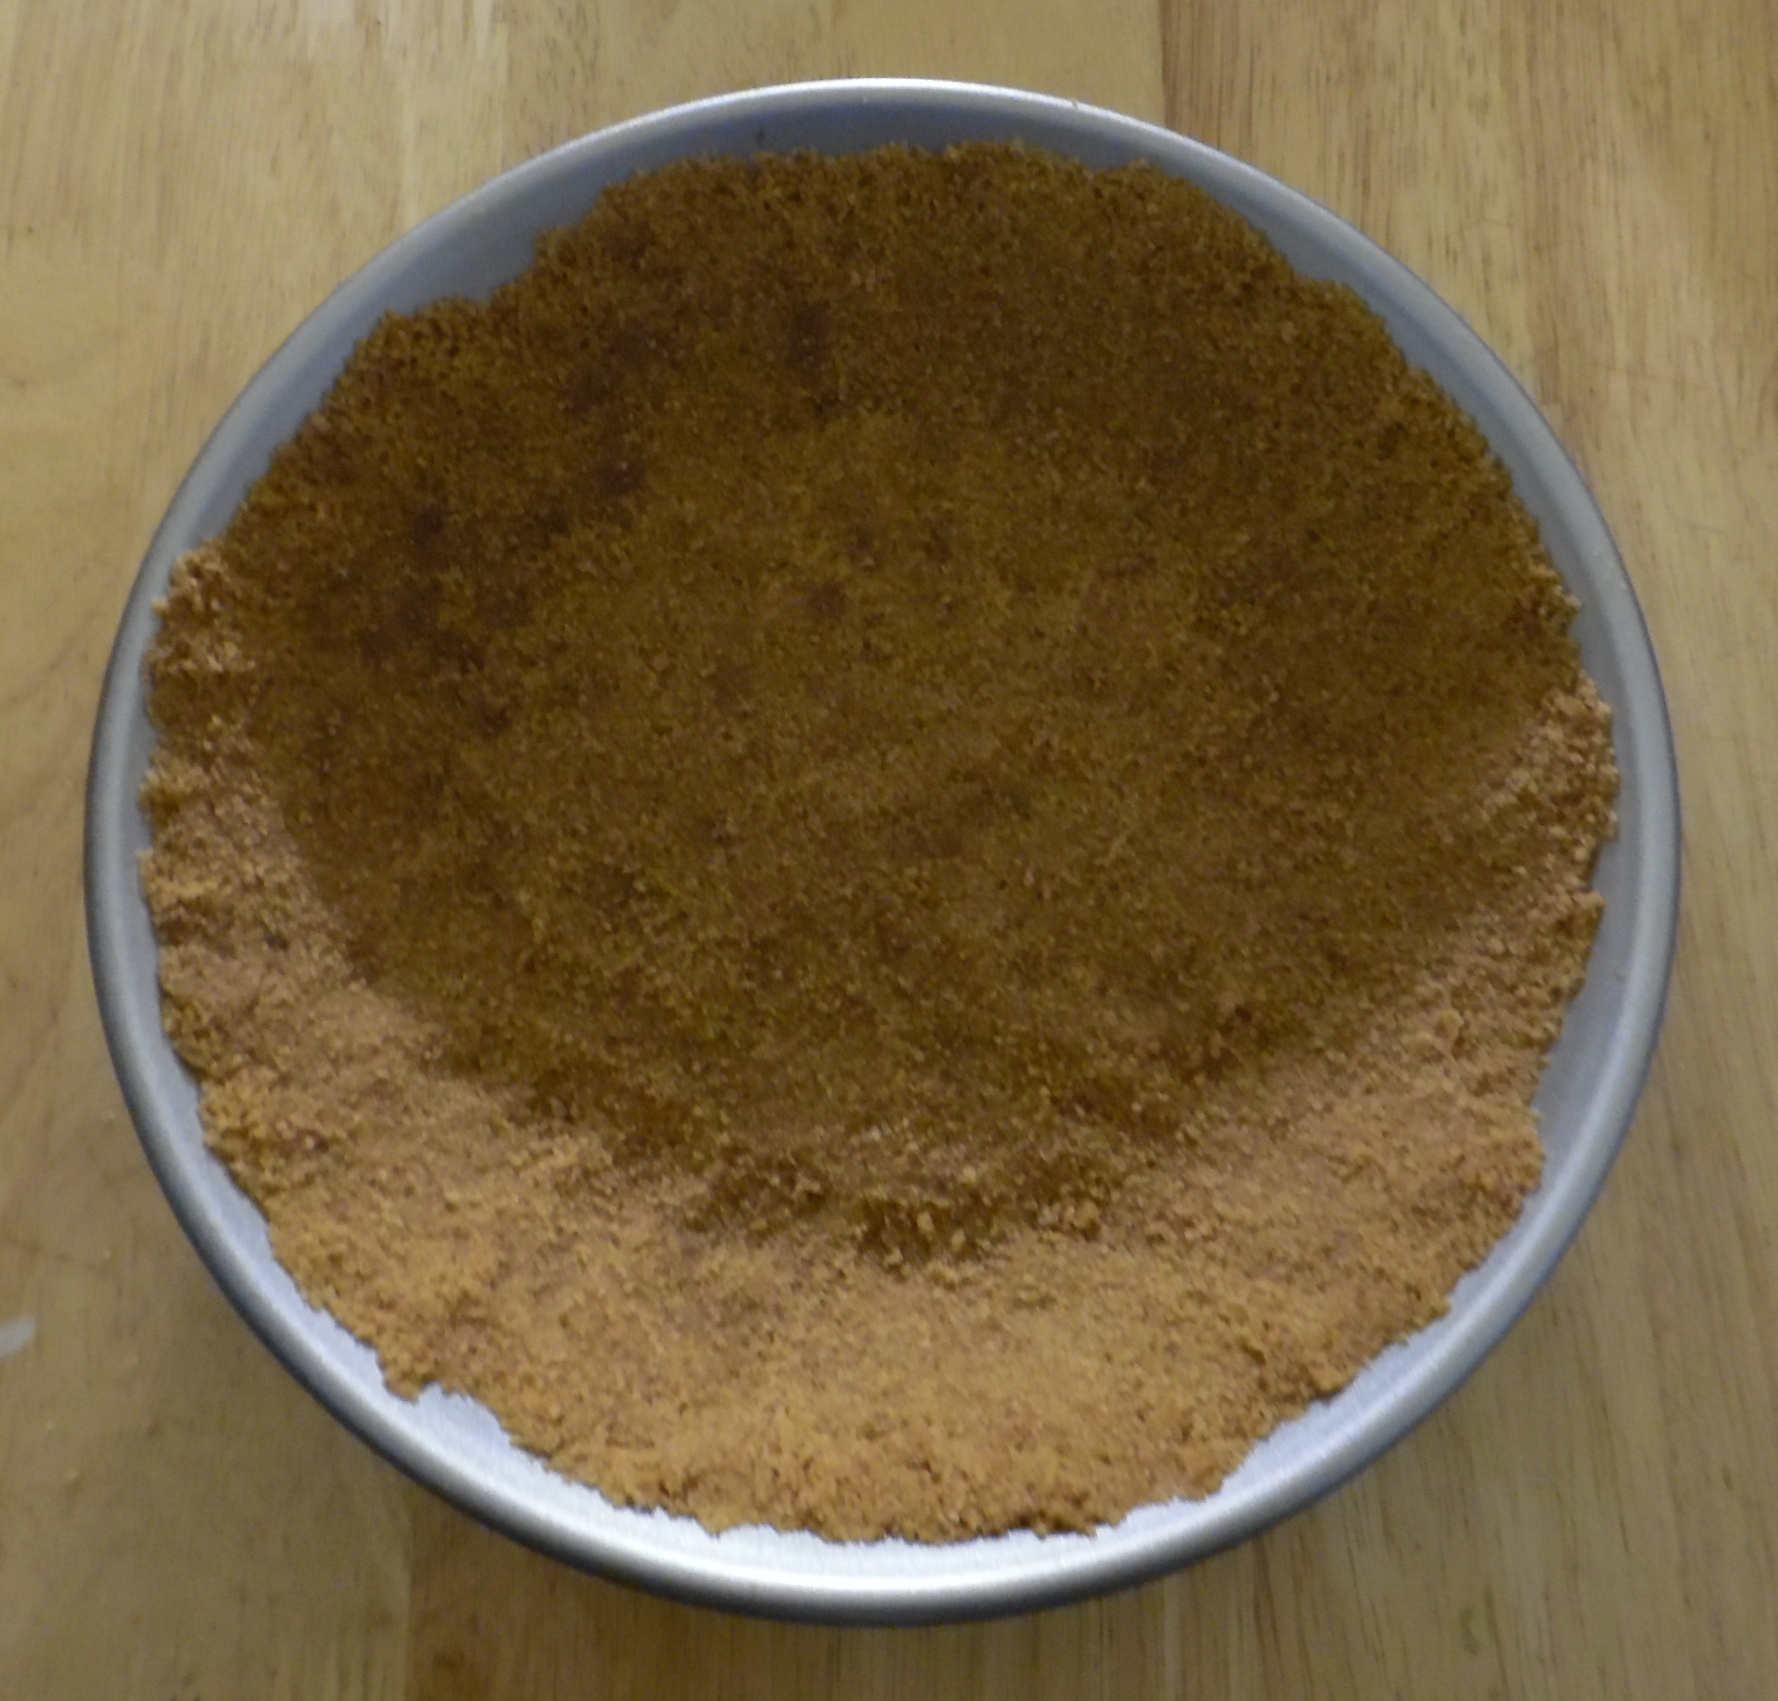
Graham cracker crust before baking.
(click to enlarge)
Two of the recipes—both the ones that come from Allrecipes.com—lack ingredients or instructions for preparing a crust, because both recipes instruct you to use a pre-made, store-bought crust.
We’ll be ignoring those, of course. A store-bought crust?! Absurd. Is it rational to use an inferior, mass-produced crust, instead of making one from scratch with your own two hands? I submit that it is not rational.
That aside, all the crust recipes are fairly similar:
- They all use graham crackers (as opposed to some other sort of cookie or cracker). (This is what a single graham cracker looks like.)
- They all use almost identical amounts of butter (ranging from 4 tbsp to just over 5 tbsp).
- The amount of sugar varies from 3 tbsp to just over 5 tbsp (though note that the Dessert Bible recipe calls for brown sugar instead of white).
- Only one recipe explicitly calls for adding salt to the crust… but that may not mean much (see footnote 2).
- The Pioneer Woman recipe calls for a whopping 18 graham crackers; the others vary in a smaller range (from 9 to 11).
- The recipes are all prepared in similarly sized pans (all but one recipe are made in a 9″ pie dish; and an 8″ springform pan will not be significantly different in volume).
- All the crusts are prebaked at 350°F, except for the Serious Eats crust, which is prebaked at 375°F.
Filling
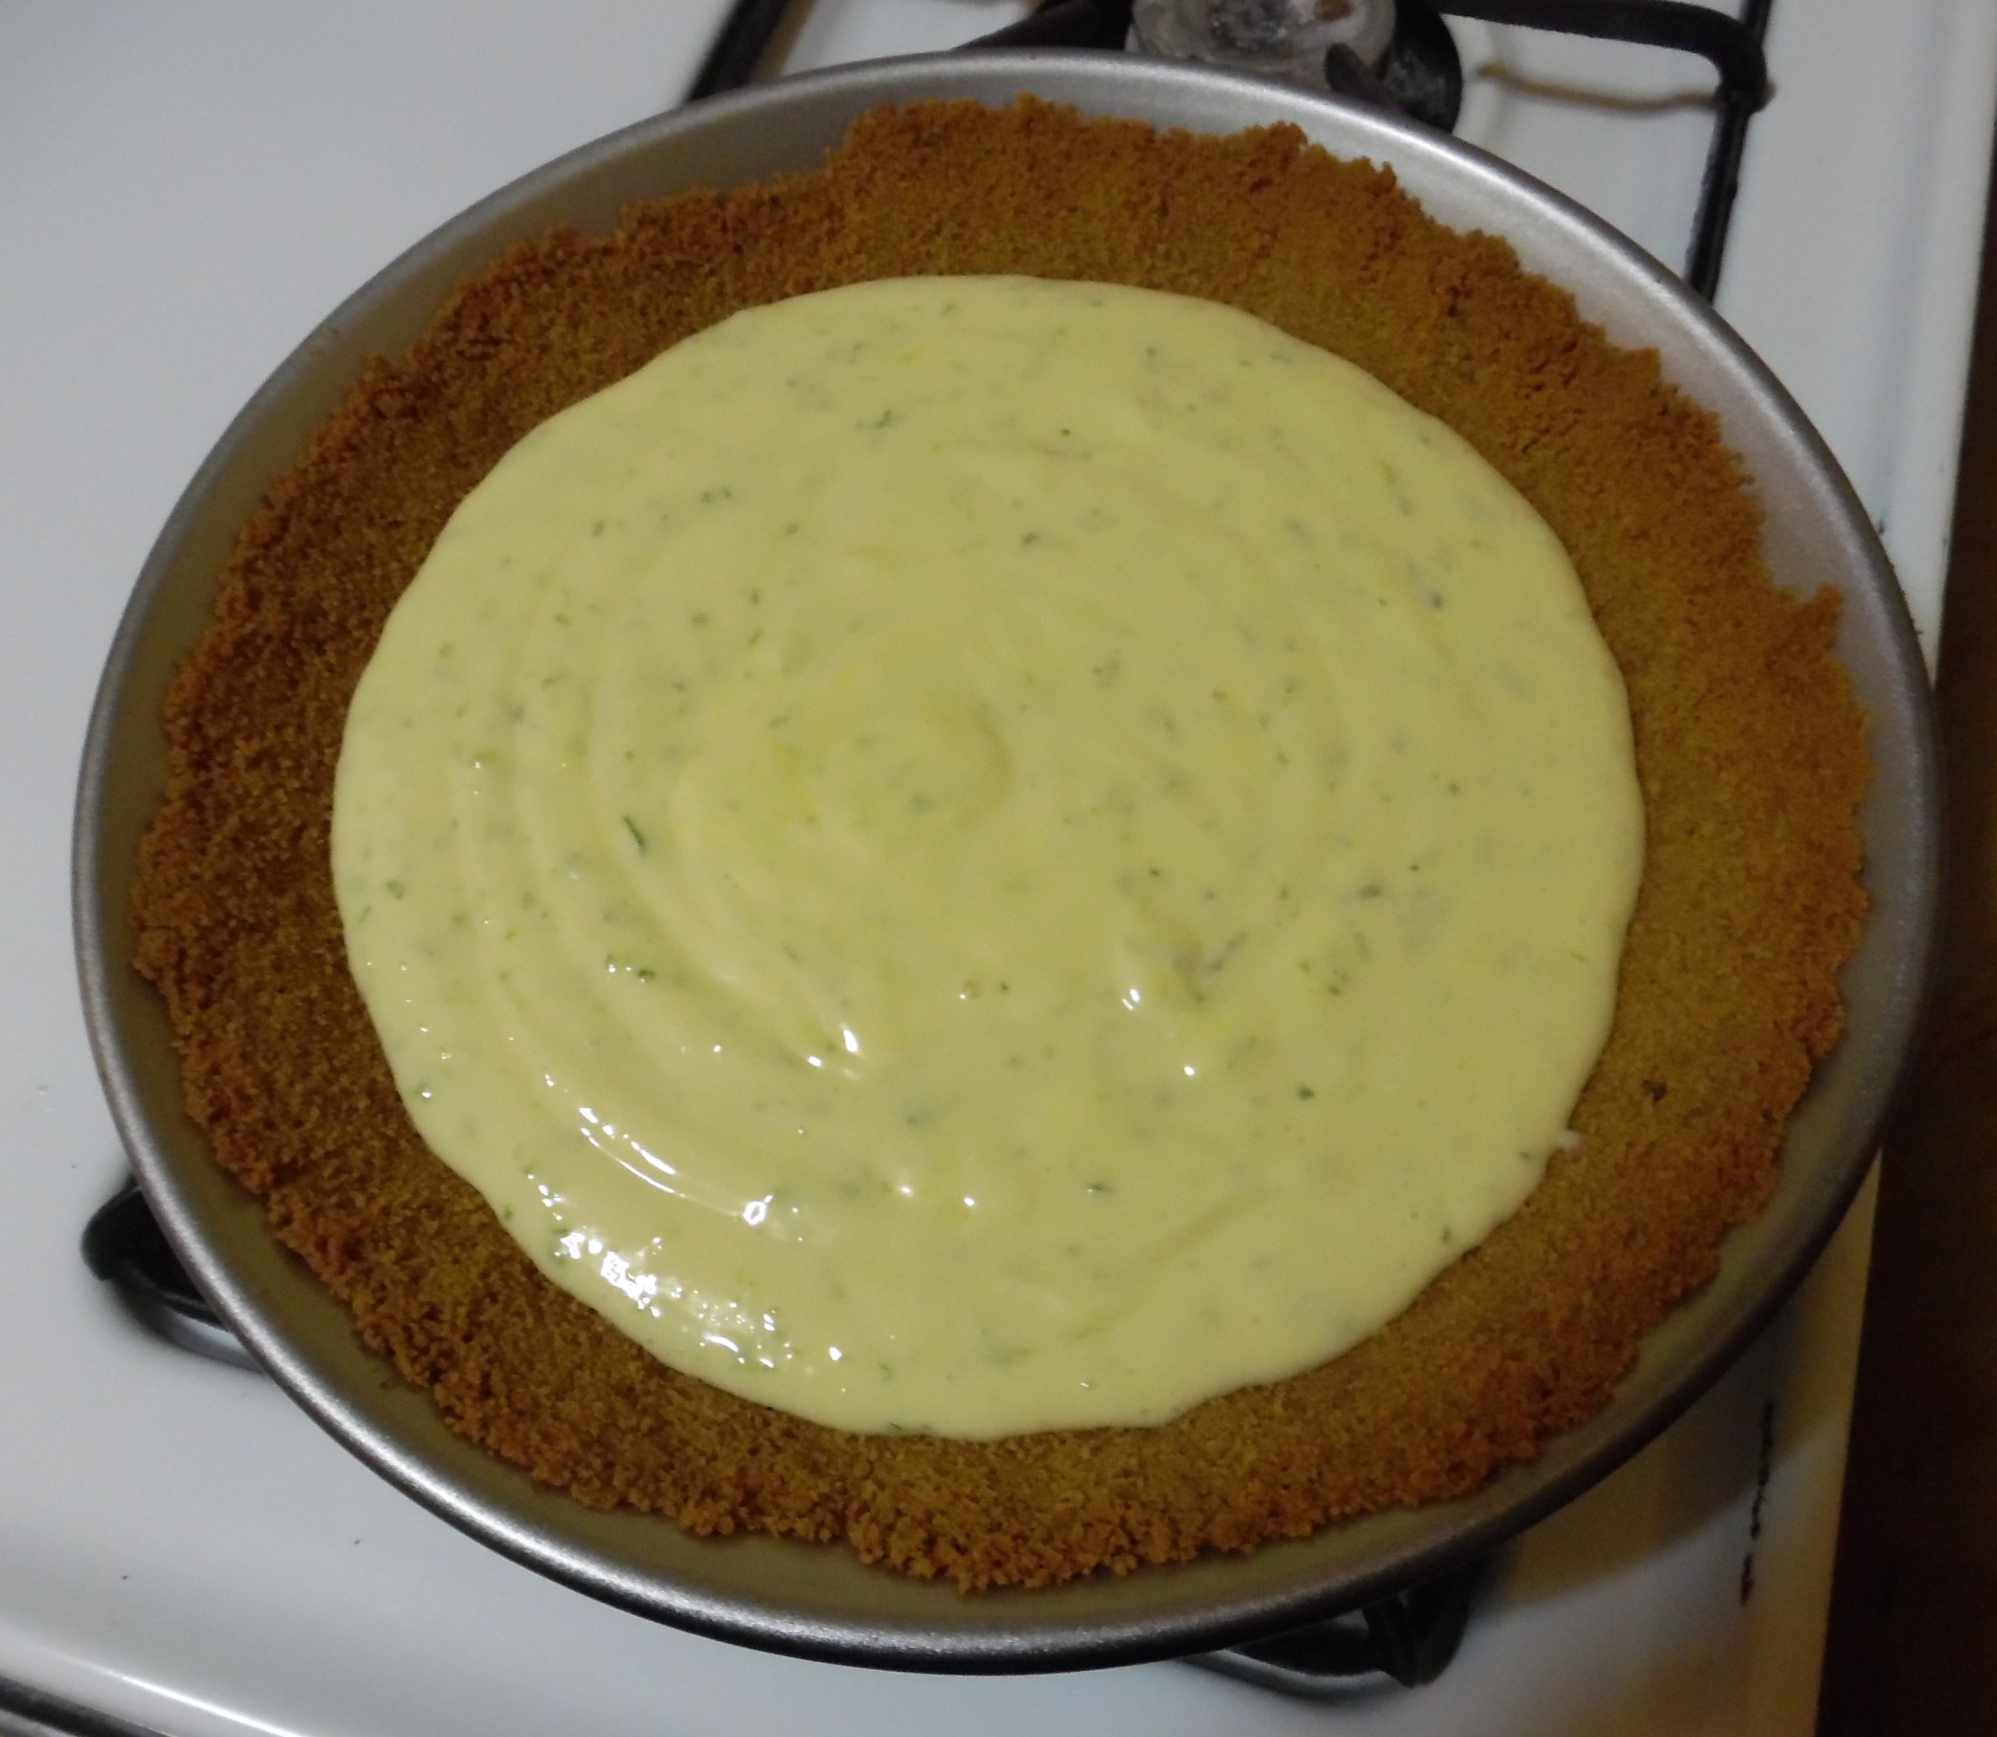
Filling, prior to baking.
(click to enlarge)
The filling, made with lime juice and sweetened condensed milk, is the star of the dessert9; and here we begin to see some interesting variation between recipes.
Comparing the filling recipes, we may notice at once that all but one calls for 14 ounces of sweetened condensed milk. That’s an awfully specific amount to be so consistent across so many recipes. What’s going on?
 |  |  |
 |  |  |
Why are they all the same size…?
(click images to enlarge)
One of the recipes—recipe (b) from Allrecipes—calls for a dramatically different amount of sweetened condensed milk (24 oz.); and we can see at once that this recipe is, in other ways also, the odd one out. It calls for no egg yolks at all, but is unique in calling for sour cream (a half-cup of it).
(An aside: consider what would happen if you decided to make a Key lime pie for the first time, searched for recipes, and chanced to choose this one, without doing any systematic comparison of recipes. Clearly, this recipe is quite different from most Key lime pie recipes; and the resulting pie is sure to be different as well. Having made the pie according to Allrecipes.com recipe (b), what would you have learned about how to make Key lime pie? Well… not much. It is so much of an outlier that having followed it, and having seen what comes of following it, simply doesn’t tell you very much about what any of the more ‘mainstream’ Key lime pie recipes are like. This is one of the reasons the SDI method is important: to ensure that you get the “lay of the land”—that you have a coherent and reasonably complete grasp of the state of available procedural knowledge of the thing you’re attempting, and what variations exist in this landscape.)
Leaving the outlier aside, the filling recipes are reasonably similar to each other:
- Amount of lime juice varies from 4 oz. (the most common amount) to 6 oz.
- Amount of lime zest is almost always 1 tbsp, although one recipe uses only 2 tsp (remember that 3 tsp = 1 tbsp), and one recipe omits it entirely.
- The egg yolks are the most widely variable ingredient; their number varies from 2 to 5 (though differences in egg size—and the fact that many recipes do not specify what size eggs to use—make it difficult to do a totally direct comparison)
Topping
Whipped cream topping.
(click to enlarge)
Key lime pie is generally topped with whipped cream, and then (optionally) garnished with a sprinkling of lime zest. Of course, the topping may be skipped; a Key lime pie is technically still a Key lime pie even without whipped cream on top.
But what kind of operation am I running here—some penny-pinching diner? No! Here at Cognitive Pie, we go for broke. Of course there’ll be whipped cream, and it will absolutely be garnished with lime zest.
Whipped cream topping (a.k.a. “whipped cream, plain and simple”) is so simple to make that several of the recipes either do not provide ingredients or instructions for it at all (only mentioning that it may be added, if desired), or provide only vague directions. Among those recipes that do tell us how to make whipped cream, however, there are several notable things.
First, only one topping recipe (from Simply Recipes) calls for vanilla extract (though The Pioneer Woman mentions that vanilla may be added at your option)—and a small amount, at that: 1⁄8 tsp.
Second, all of the recipes call for confectioner’s (a.k.a. powdered) sugar, not granulated or caster sugar.
Finally, one recipe—the one from Serious Eats—adds an interesting optional ingredient: 1⁄4 cup mascarpone (a soft, spreadable Italian dairy product that’s somewhat similar to cream cheese, but is less sour, and has a more complex flavor).10
Process
Crust
Making a graham cracker crust is simple, but we can see one major variation among the recipes: whether or not the crust should be chilled in the refrigerator prior to baking. Two of the recipes say yes; the others skip this step.
Other than that, all the recipes instruct us to make the crust in the same way:
- pulverize crackers (using a food processor is usually, and quite reasonably, suggested for this)
- add sugar
- add melted butter
- press into pan
- chill (in the case of two of the recipes)
- prebake (then remove from oven, to add the filling to it).
 Graham crackers
 Processed graham crackers
 Melted butter added
 Crust mixture, before being pressed into pie dish
-
Crust before baking
 Prebaked crust
Nearly all the recipes tell you to bake the crust at 350°F, except for Serious Eats, which specifies 375°F. Baking times, however, vary substantially—from 5 minutes all the way up to 15 minutes (in the case of the Dessert Bible standalone recipe for graham cracker crust).
Filling assembly
The filling for Key lime pie is also quite straightforward, having less than a handful of ingredients and requiring no complex processing. Most of the recipes simply instruct you to “mix” or “combine” the ingredients (one recipe—the Serious Eats one—tells you to do this with the food processor; the others say to mix in a mixing bowl). Two of the recipes, however, tell you to beat the egg yolks by themselves, until light and fluffy, and only then to add the other filling ingredients. In either case, the filling is then poured into the crust, which is then returned to the oven for baking.
Baking
Baking temperatures for the filling vary from 325°F to 375°F. Baking times vary from “5 to 8 minutes” on the low end to “14 to 17 minutes” on the high end.
Topping
Several of the recipes give fairly detailed instructions for making the whipped cream topping, while others leave it as an exercise for the reader. I won’t enumerate the differences here, because, for the most part, whipped cream is whipped cream, and one can find instructions for making whipped cream anywhere; they will not be particular to Key lime pie recipes (since the pie, at this point, is already baked, and the topping is simply placed on top of it).
Post-processing
All but one recipe instructs you to chill the pie in the refrigerator before serving (for varying amounts of time, from “1 hour” to “overnight”; though most recipes suggest that longer is better). One recipe, however, also tells you to freeze the pie for 15–20 minutes before serving.
Analysis (distillation, part II)
Here I depart from the SDI method as described by Alicorn, by adding an extra step to the ‘distillation’ of the collected knowledge. In this part—analysis—I closely examine what I’ve learned via ‘distillation’, and I make sure that I understand, as specifically and as comprehensively as possible, why each recipe is the way it is. What is each ingredient doing in the recipe? Why that much, and not more, or less? If an ingredient is present in one recipe that is absent in another, why is it there? And if vice-versa, why is it missing? What is the cause of the variations in quantities, both small and large? How much is explained by chemistry, how much by convenience, how much by preference, and how much by happenstance?
It is not always possible to know, with certainty, the answers to all of these questions. But the more of them I can answer, the more solid will be the ground for the next step: synthesis (a.k.a. ‘improvisation’). Once I know why things are they way that they are—and why they are sometimes one way, and sometimes otherwise—then I will know enough to judge how they should be. These judgments will be based on my predictions of what will yield the best result (in cases where the result may be evaluated more or less objectively), and also on my own preferences (which may—indeed, almost certainly will—differ from the preferences of many other bakers and recipe-writers).
Aside: background knowledge
We have already seen how background knowledge—of ingredients, of baking techniques, etc.—is helpful, or even necessary, when ‘distilling’ the collected knowledge. If you did not know that graham crackers come in boxes of three packets, or that sweetened condensed milk is sold in one particular size of can, or that most pies are made in 9″ pans, then you would have, by now, been led astray several times. (Confusion about ingredient amounts, in particular, can easily ruin a recipe.)
In the ‘analysis’ part of the process (and even more so in the ‘synthesis’ part), background knowledge becomes even more critical, as we’ll see. It’s simply infeasible to apply this sort of technique if you start from a place of zero knowledge of baking. (I expect that this generalizes to other domains as well.) The remedy for this, in my experience, is to bake many desserts, trying out many recipes; to read detailed explanations such as this blog post (or, even better, cookbooks such as the Dessert Bible, which contains both detailed background information and a slew of easy-to-follow and well-explained recipes); and to discuss the subject with other bakers, of various levels of experience.
Crust ingredients
(click to enlarge)
There is not much to say about the crust of a Key lime pie that can’t be said of any graham cracker crust. Certainly it’s delicious. The butter softens the cracker crumbs and makes them stick together; the sugar sweetens it. The crust hardens as it bakes, turning into something like one giant, pie-shell-shaped cookie.
Chilling the crust
Why chill the crust before baking? It’s not clear. In the two recipes that include a chilling step, the crust clearly requires more baking (a higher temperature in one case, a longer baking time in another). Isn’t it a wash, then? Couldn’t you not chill the crust, and bake it a bit less, and end up with the same result? I don’t know. I have never thoroughly investigated this, and it might make a good project for another time (and another blog post).
Pan type
Is there some special significance to the Serious Eats recipe’s use of a springform pan instead of a regular pie dish? I don’t think there is. This appears to be a matter of convenience and preference. (I can imagine, in particular, that a springform pan would work better than a pie pan if all the pie pans you had were very shallow, and incapable of holding the requisite amount of crust and filling; whereas you could press the crust up the sides of the springform, using it as an impromptu pie dish.)
Crust baking time
It is difficult to analyze baking times, for several reasons.
First, many ovens are mis-calibrated. Set your oven to 350°F, and it may in fact heat to 325°F or 375°F. Oven thermometers can help (and I have two, myself), but only to an extent (as they tend to be imprecise as well as inaccurate—the latter fact demonstrable by buying two of them, using them side by side, and noting that they indicate different temperatures—which is right? who knows!). Ambient temperature may also vary within an oven (from bottom rack to middle to top; from left to right side; from front to back). Some ovens have a convection feature, while most do not; this further complicates the comparison.
Second, even given a known oven temperature, many factors may affect the time required to bring the crust (or any other baked dessert) to the desired state, not least of which is the composition and construction of the pan: is it steel, aluminum, glass, ceramic? Thick or thin? Nonstick or no? Dark or reflective? Deep or shallow? Each of these things can affect baking times. Other factors, such as the brand of butter (some butters have a higher fat content than others) and how the crust is pressed into the pan (loosely or densely), can also make a difference.
For these reasons, baking times for all sorts of desserts are often qualified with “… or until golden” (as in the case of all of the recipes we’re looking at today), or “… or until set”, “… or until browned and springs back when touched”, etc. In other words, the procedure is not “bake for X minutes”, but rather: “bake until the thing has reached state Y—however long that might take (but note that it’s likely to take in the neighborhood of X minutes)”. (Why give a time at all, then? To calibrate expectations; if a sponge cake should bake for an hour, you need not start checking it 5 minutes after baking begins; if a batch of cookies should bake for 10 minutes but yours have been baking for 25 and are still not done, then you know something is wrong; etc.)
The problem, of course, is that for someone who has never made a certain sort of recipe before, such qualitative descriptions are hard to judge. Just what exactly constitutes “golden”? (Must you have a bar of actual gold on hand, for visual comparison, or at least a PANTONE catalog? Should the list of essential kitchen tools for the aspiring dessert chef include a spectrophotometer?)
Prebaked crust.
(Is this “golden”? Was it not “golden” before…? Who knows…)
(click to enlarge)
The only real solution is to try it, do your best, see how it comes out, and adjust. Looking at pictures can help; more detailed descriptions can help; but there is really no substitute for experience, when it comes to judging these things. (That is the other reason explicit baking times are provided, along with qualitative descriptions—so that you have a sane default to fall back on, if you’re making the recipe for the first time, and judging whether or not the crust has turned ‘golden’ is too tricky or too unreliable.)
The bottom line is that the variation in baking times specified for the crust, among all of these recipes, is nearly meaningless. I will have to rely heavily on my own judgment and experience to know when the crust is done.
(Fortunately, the margin of error here is relatively large; both a slightly underbaked graham cracker crust and a slightly overbaked graham cracker crust taste almost the same as one which is baked exactly right. There is no sharp breakpoint, no sudden phase change. This is not true of all baked desserts—indeed, it’s not true of the filling for this very pie, which must be baked to a fairly specific consistency to taste ideal—but it’s true in the case of the crust. So if you’re not sure whether the thing is quite ‘golden’ enough, or just a bit too ‘golden’… don’t sweat it.)
Filling ingredients
(click to enlarge)
Lime juice
The filling is the heart and soul of a Key lime pie. Getting it just right is of paramount importance; so we must understand its composition—the ingredients, and how they go together—as thoroughly as possible.
Foremost among the questions before us is: must we use Key lime juice? Might regular11 lime juice be sufficient? And as far as I can tell, the answer is clear: regular lime juice is just fine (and, perhaps, even better).
I am not alone in this judgment. Stella Parks of Serious Eats published an article titled “Key Limes? More Like Key LIES” that skewers the notion that only Key lime juice is acceptable for the pie of the same name; and the Key lime pie recipe from The Pioneer Woman (one of the ones I list in the “pie matrix” above) also uses regular, non-Key limes, with (reportedly) delicious results.
It so happens that Key limes are available near me… but they are very expensive, with a single Key lime costing about a dollar (whereas regular limes can be had at 3 for $1); when you recall that Key limes are much smaller than regular limes (perhaps one-third the volume), you can see that I’d be paying a whopping 800% premium. That seems excessive.
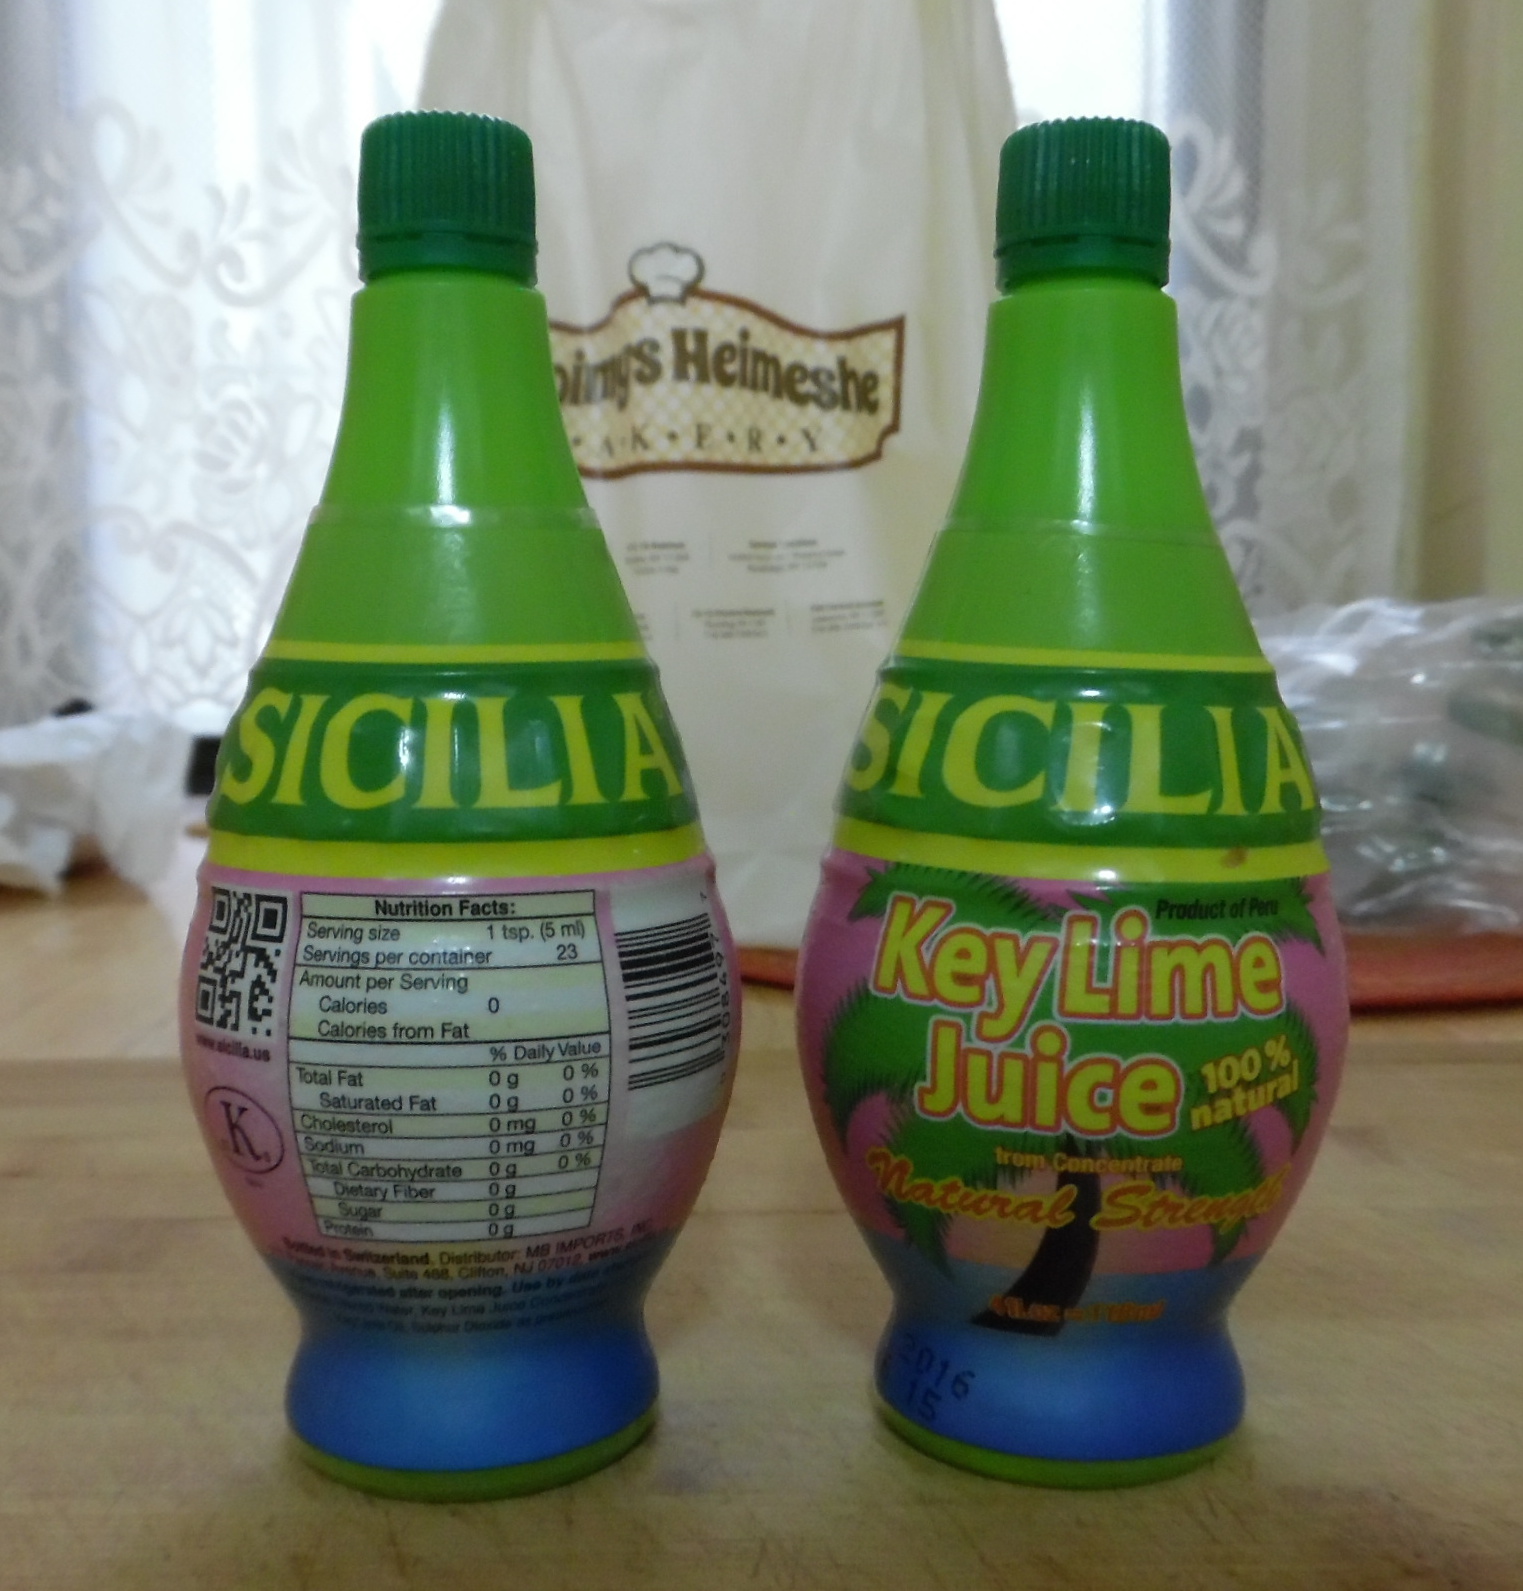
Bottled Key lime juice.
(click to enlarge)
Also available near me is bottled (from concentrate) Key lime juice, imported from Peru. Which of these things to use is a question I’ll tackle in the next section.
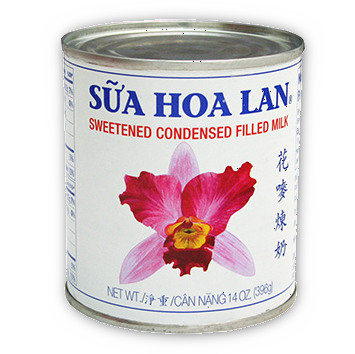
Sweetened condensed milk
The other key12 ingredient in the filling is sweetened condensed milk.
Now, sweetened condensed milk is a delicious product in its own right13, and we should not look askance at any dessert recipe that uses it. However, it’s important to note that the reason it was originally used in Key lime pie is not choice, but necessity: as Wikipedia tells us, “Fresh milk was not a common commodity in the Florida Keys before modern refrigerated distribution methods.”
The reason it is still used in Key lime pie today—despite easy access to fresh milk—is a combination of tradition and the fact that Key lime pie recipes have, over the span of a century, been designed and optimized around the inclusion of this particular ingredient. So even though there’s no reason to believe that it’s impossible to substitute something else and still have the recipe work (or even work better), I will not even be considering any substitutions—at least, not before I’ve found a perfect Key lime pie recipe made in the usual manner.
As far as how much of it to use: as I explained earlier, most Key lime pie recipes call for 14 oz. of sweetened condensed milk, because—no matter the brand—it comes in 14-oz. cans.
… unless, of course, you buy a Russian brand of the stuff, in a Russian supermarket. (Sweetened condensed milk is very popular in Russia.) Then the amount you get in a can might vary as much as an ounce in either direction, and you may even find yourself buying one of these:
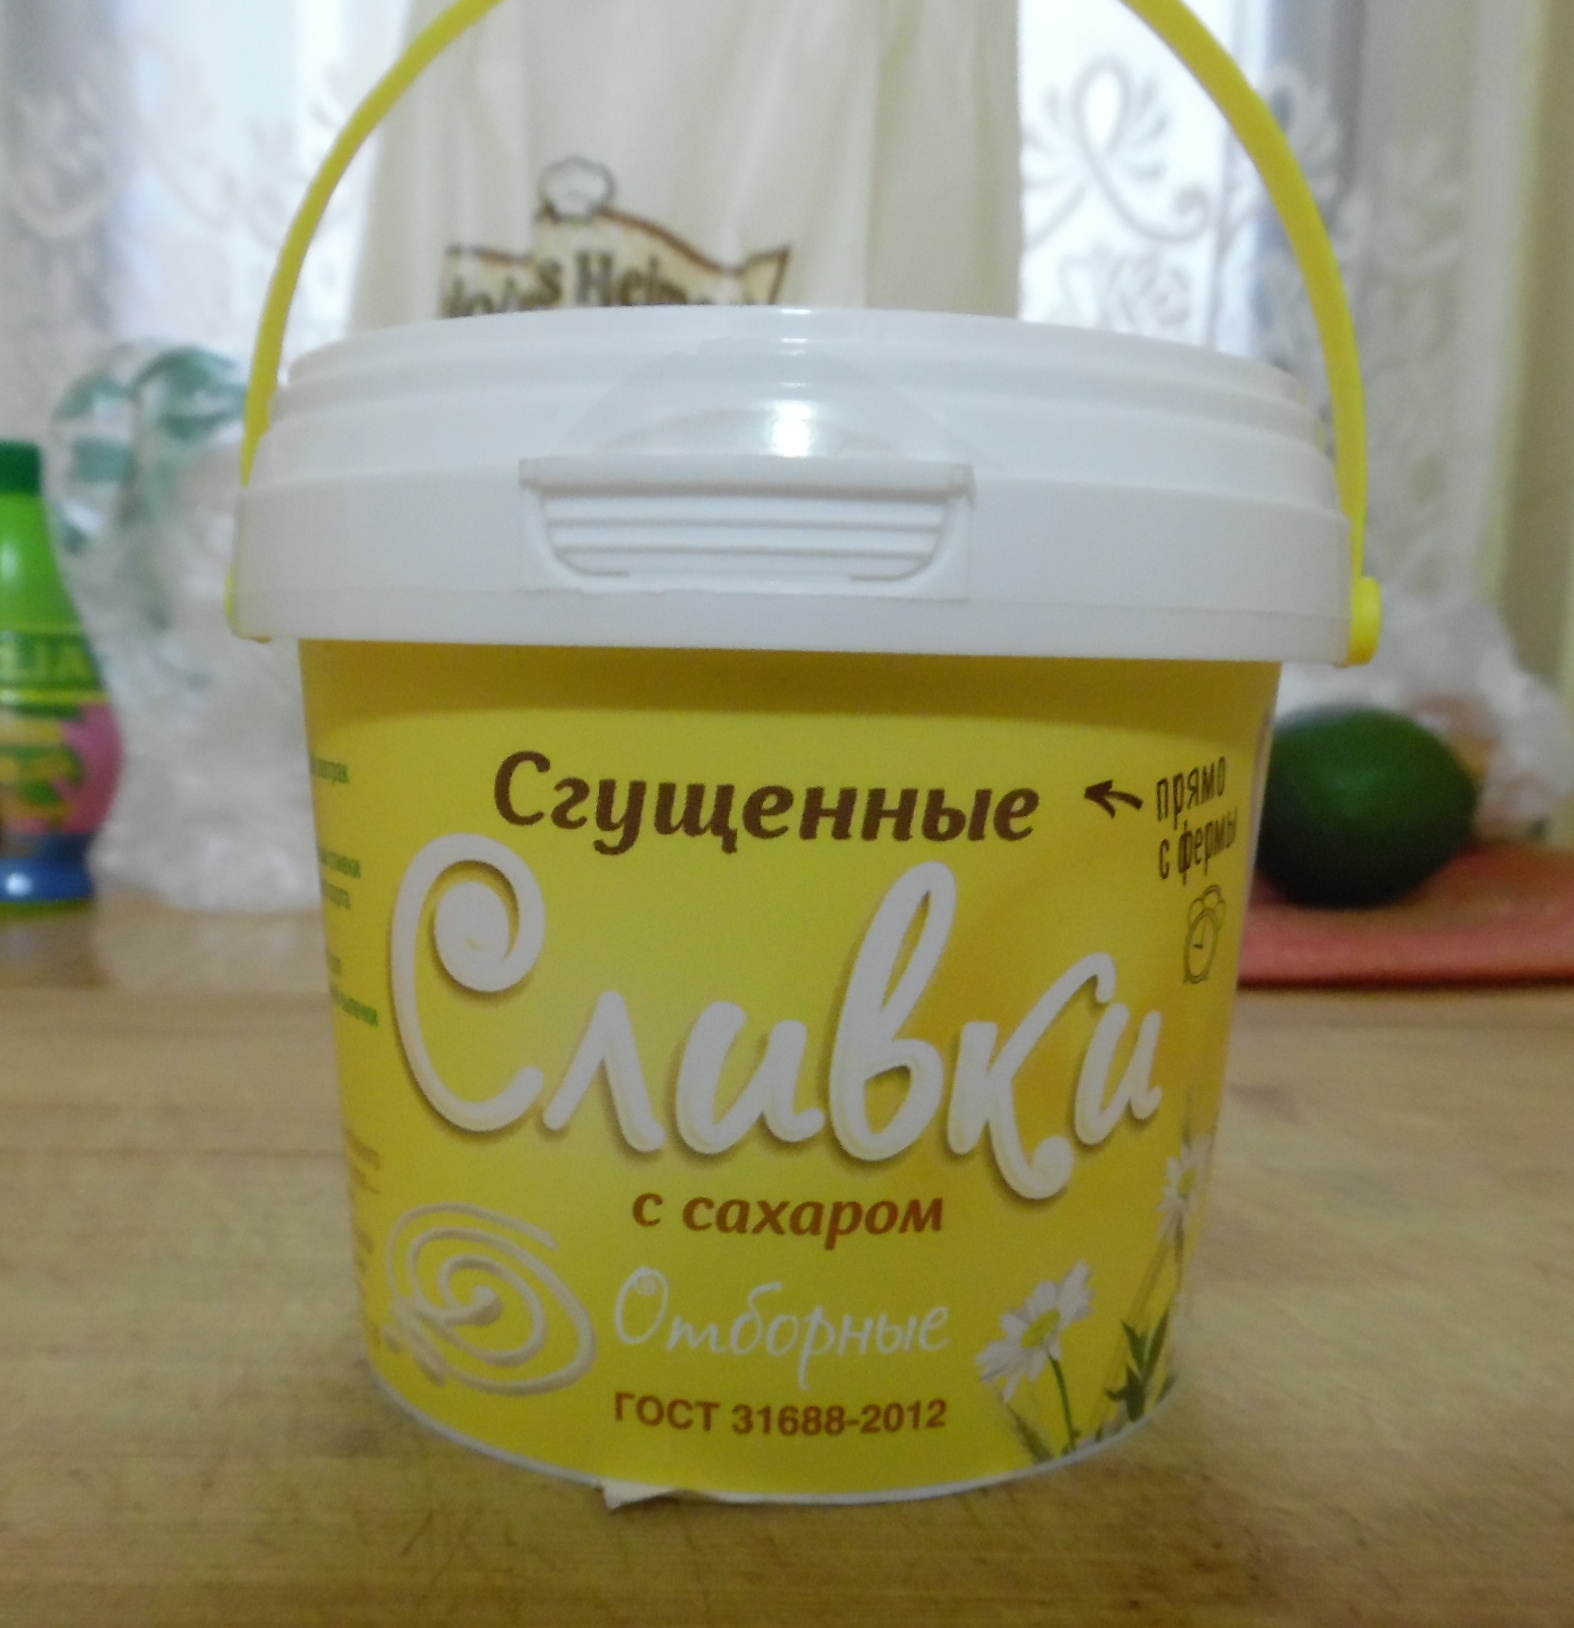
“Condensed cream with sugar”.
(click to enlarge)
This adorable mini-bucket holds 400 grams of delicious, cream-based sweetened condensed milk (which, the label informs us, came “straight from the farm!”). (14 oz. is equivalent to 396 grams.)
Will this degree of variation affect the recipe? Statistically, no. A difference of up to a half-ounce either way is indistinguishable from noise (‘noise’ in this case coming from many factors; e.g., the amount of product that remains in the can after you empty it—will you bother scraping out every last tiny drop? Probably not!).
Egg yolks

(click to enlarge)
The amount of variation between the recipes, in how many egg yolks to use in the filling, is distressing. For example, four of the recipes use 2, 3, 4, and 5 yolks respectively, despite the fact that each uses exactly identical amounts of both lime juice and sweetened condensed milk. What’s going on?
Might egg size be the answer? If we look at the egg sizes defined by the U.S. Department of Agriculture, we can see that “jumbo” eggs are almost 50% larger than “medium” eggs, and about 25% larger than “large” eggs (which Wikipedia tells us is the size most commonly referred to, for recipes).
Unfortunately, none of the recipes I looked at specify a size of egg from which to take the yolks. In any case, it does not seem that egg size disparities are sufficient to explain the degree of variation in yolk quantity from one recipe to another. So let’s ask: what are the yolks doing in this recipe?
Before we begin speculating, let’s see if someone already knows the answer. The Dessert Bible doesn’t include a Key lime pie recipe, but it does have a section on custard pies, which mentions that “eggs … add flavor and provide emulsification” (and Wikipedia confirms that egg yolk acts as an emulsifier). Might the egg yolks help to stabilize the mixture of lime juice and sweetened condensed milk, improving the texture? The Dessert Bible also tells us that in a lemon meringue pie recipe, increasing the quantity of yolks makes the filling “richer and smoother”. Egg yolks also contain a lot of fat, and fat affects how we perceive the flavor and texture of food (generally making it taste better, of course).
So there’s no clear answer (that I’ve been able to find), but based on available information, it seems likely that the egg yolks are critical to both the texture and the flavor of the pie filling. More egg yolks should yield a smoother, richer texture, and a deeper and more satisfying flavor—in short, should make the filling more custard-like.
Filling assembly
-
Four extra-large egg yolks.
 Hand mixer, for beating the yolks.
 Beaten egg yolks.
 Adding lime zest.
 Lime zest mixed into the beaten yolks.
 Adding the lime juice and sweetened condensed milk.
-
Filling poured into prebaked crust.
Beating the yolks incorporates air into them, and makes the mixture more smooth. In many other sorts of recipes that include egg yolks, beating the yolks yields a fluffier, creamier final product (whereas not beating the yolks makes for a denser final product). The effect is unlikely to be large, however, because the yolks are mixed with other dense liquids, and no flour; thus no stable foam can form and solidify. (There’s that background knowledge again!)
Baking temperature
The mean, median, and mode of the baking temperatures across the sampled recipes is 350°F. There does not seem to be a clear reason for either of the two outliers.
Baking time
At first glance, there seems to be a great deal of variation in the specified baking time. But a closer look reveals that the low outlier—Allrecipes.com recipe (b)—is also the recipe that includes no egg yolks, way more sweetened condensed milk than all the others, and is unique in including sour cream. Clearly, something different is going on in this recipe; to evaluate the others, we have to discard this one.
The variation in the remaining recipes doesn’t seem to be correlated with any obvious property of the filling. It’s entirely possible that variations in oven performance suffices to explain it. In any case, most of the recipes quite correctly caution you to bake not for any set amount of time, but “until the filling is just set”.
But what does that look like? What is “just set”? Once again we can turn to the Dessert Bible for a hint, which (in the sections on custard pies and cheesecakes—both of which are, in their own way, similar to Key lime pie) suggests that we should bake the dessert until the filling is no longer liquid, and is clearly fully set on the edges, but jiggles a bit in the middle, when shaken.
Topping ingredients
I have little to say here; whipped cream is a pretty simple thing. Analyses of its properties, techniques, etc., are ubiquitous. Assuming that our basic technique is sound, variation in preferences will almost certainly outweigh most other considerations when it comes to nailing down this part of the recipe.
The one thing to note is that the use of confectioner’s (rather than granulated) sugar is almost certainly for the purpose of stabilizing the whipped cream (i.e., preventing it from “weeping” or “separating”). (Note that the inclusion of mascarpone or cream cheese actually serves a similar function, though it has a larger effect on the flavor and texture of the final product.)
Topping process

Making whipped cream.
(click to enlarge)
Once again, making whipped cream is a simple process. There are some tips and tricks one can apply; these may be googled easily enough. “How to make the perfect whipped cream” is certainly beyond the scope of this post, and is well-trod ground in any case.
Post-processing
Chilling the product after baking is a step common to many recipes for baked desserts that contain eggs and dairy (one finds it often enough in recipes for cheesecakes, for brownies, etc.). What does it accomplish? Empirically: it improves the flavor. This fact is asserted by many cookbook writers, food bloggers, etc.; it can be verified easily enough in practice. In my experience, it’s 100% true. Brownies, cheesecakes, and many other such desserts just don’t taste as good immediately after baking as they do after sitting in the fridge for a good few hours. (Why is this? I don’t know. It’s an excellent question, which I’ll have to put off answering for another time.)
So, if all but one of the recipes I surveyed include an instruction to chill the baked pie, then it seems entirely plausible that Key lime pie is simply another one of the many desserts for which the flavor is improved after several hours in the fridge.
Synthesis (improvisation)
This part is where preference and opinion enter the equation.
For some parts of the recipe, the analysis we did in the previous section will point to a clear best choice among the available option; for others, there may really be only one way to go. But in some cases, there will be multiple possibilities, and selecting among them will be a matter of taste. Well, what’s life without strong opinions, eh?
Crust
The pie dish I intend to use is a particularly deep (the better to hold a lot of pie filling) 9″ model. So I’m going to err on the generous side, and use 11 graham crackers. Correspondingly, I’m going to go with 5 tbsp of both butter and sugar; and, as per the Dessert Bible recipe, it’ll be dark brown sugar (the flavor will be more complex that way). I see no compelling reason to add salt, despite the fact that I use unsalted butter.14
I will prebake the pie crust at 350°F, once again due to lack of any good reason to deviate from this standard temperature (and to avoid having to wait for the oven temperature to adjust between prebaking the crust and baking the filling). As for baking time, I’ll default to 10 minutes, at which point I’ll start checking the crust to make sure it’s properly “golden”.
Filling
Limes
Here I digress to recount a curious thing.
I didn’t pay close attention when purchasing the limes for this pie, but after coming home and unpacking my groceries, I noticed something about the limes I’d bought:
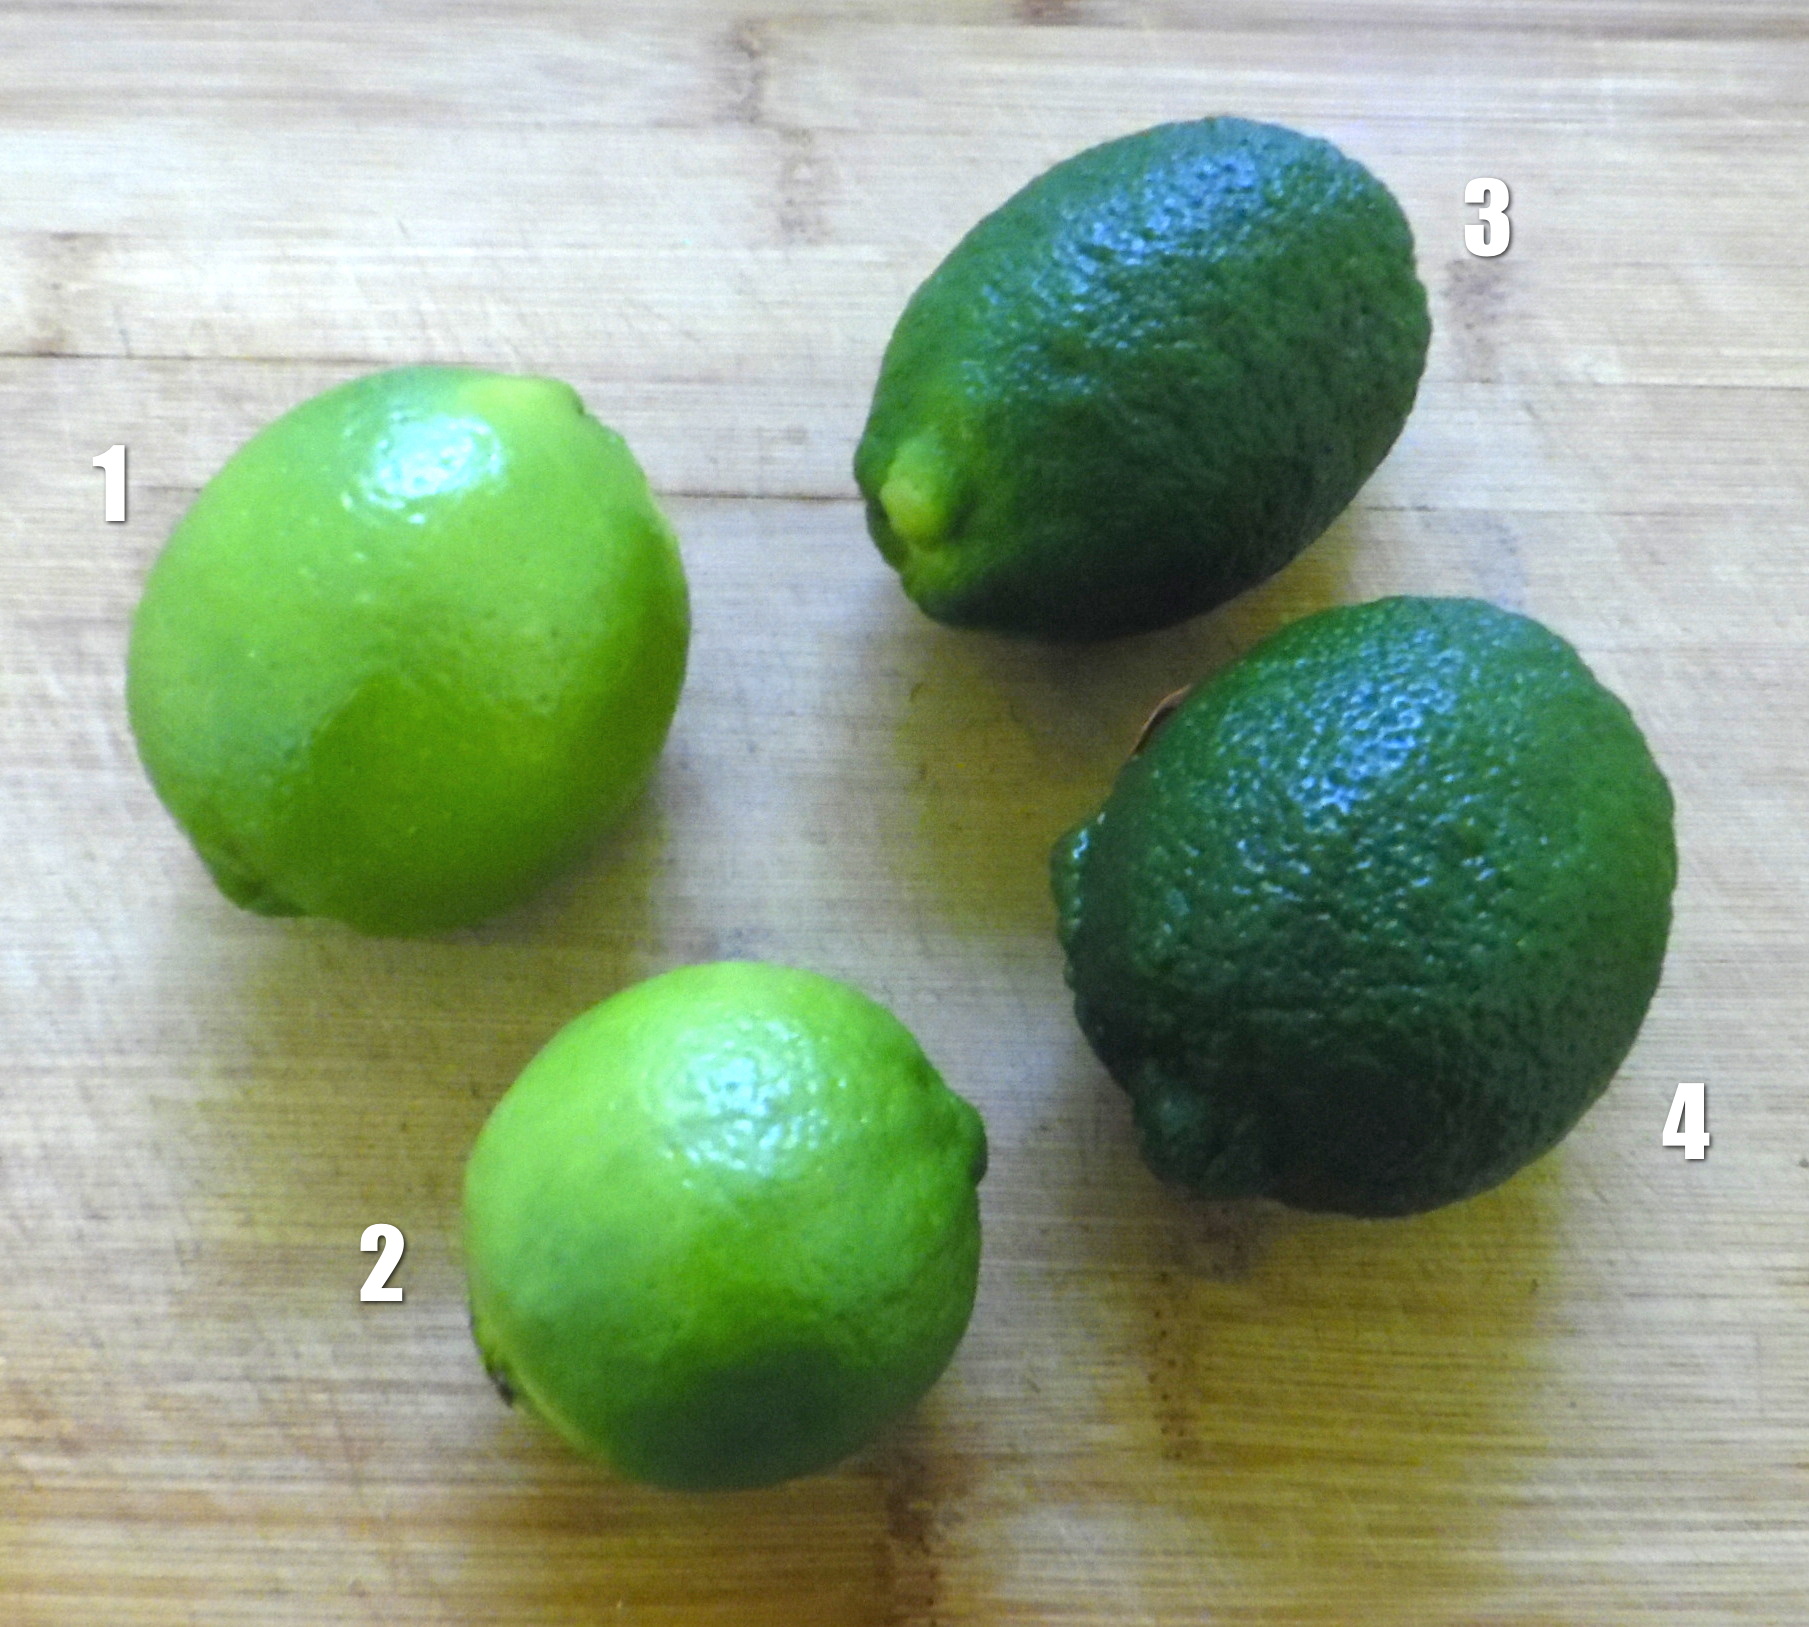
(click to enlarge)
I got these four limes from the same local greengrocer; they were all heaped together, and not labeled any differently. And yet it’s clear that what I’ve got here is two different varieties of lime! The two limes on the left (what I’ve labeled #s 1 and 2) have a lighter green and smoother rind, and are more spherical; while the two limes on the right (#s 3 and 4) have a much darker and knobbier rind, and are more elongated.
This difference was confirmed after I zested the limes and quartered them (in order to squeeze out the juice). Here they are, in cross-section:
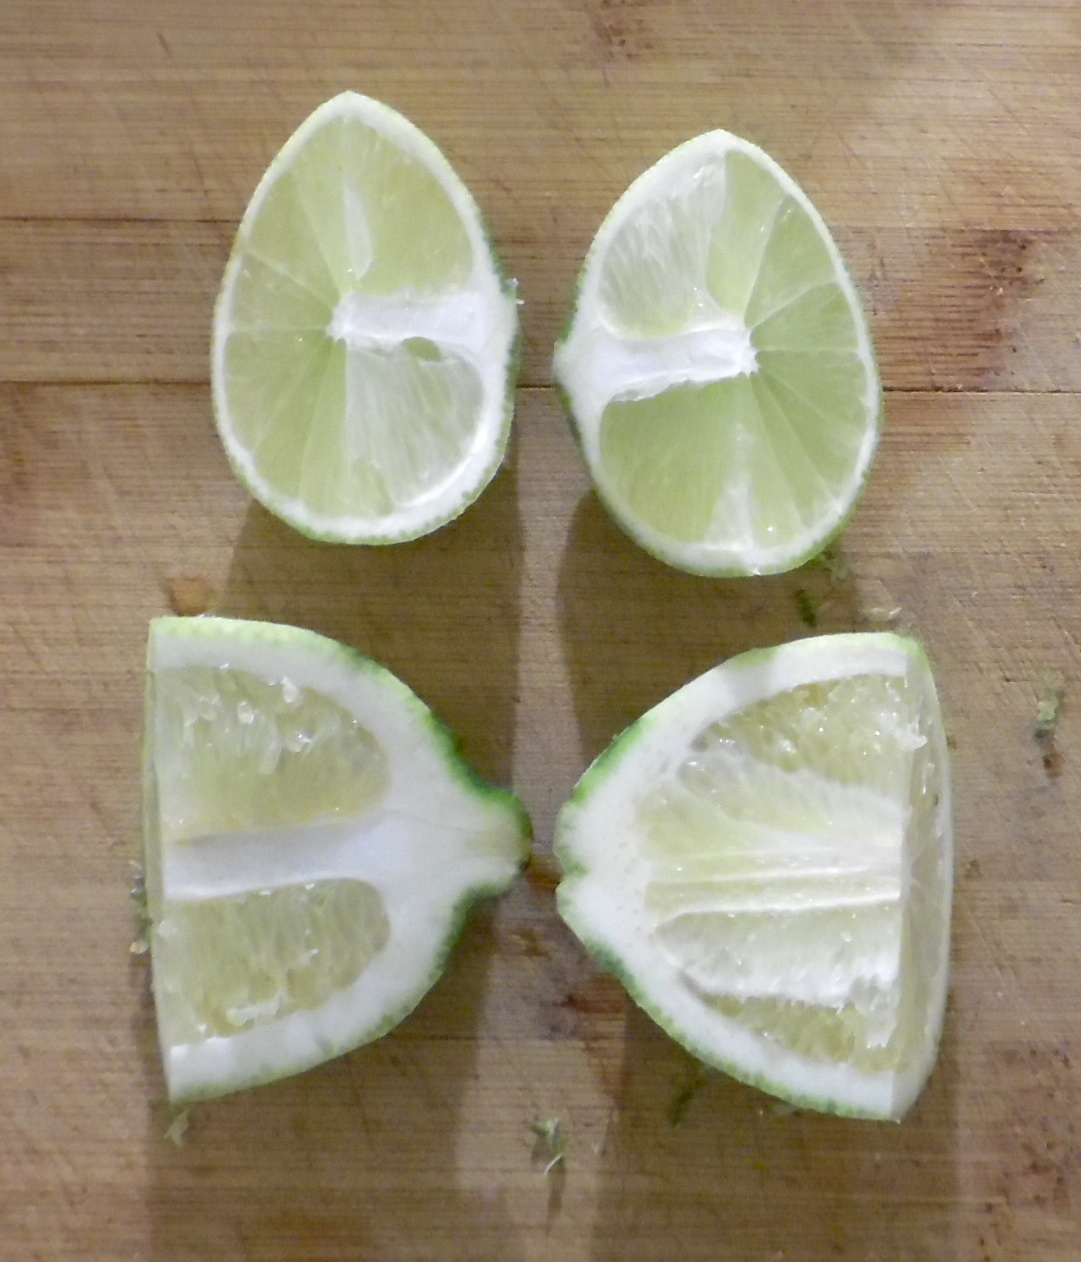
Lime #2 (top) and lime #3 (bottom)
(click to enlarge)
(Lime #1 was similar to #2, and #4 to #3, inside as well as out.)
But do these two varieties of lime differ in any important way—anything other than shape and texture and so on? They do indeed, which I discovered when I began squeezing the juice from them. Limes #1 and #2 (the lighter, smoother, more spherical ones) produced a large amount of juice. But limes #3 and #4 (the darker, knobbier, more elongated ones) were extremely dry. I do not exaggerate even a little bit when I say that I got only one drop of juice from the entirety of lime #3. (Lime #4 was slightly juicier—but not by much.)
My point? That you can (as I did) buy a bunch of perfectly ordinary limes—intending to zest and then juice them—and then find that while you’ve ended up with plenty of zest to garnish the pie with, you haven’t nearly enough juice for the filling.
What to do? Well, here’s what I did: I simply supplemented the juice I managed to squeeze out of the limes with some bottled from-concentrate Key lime juice. There’s no law against mixing-and-matching!
Of course, that makes pinning down the ideal amount of juice tricky. Key limes, as we know, are more acidic than regular limes; so if using regular lime juice, we should probably use more of it (to give the filling a properly strong lime flavor). It seems to me that 1⁄2 cup (the most common amount in the recipes I surveyed) is sensible if using Key lime juice; but if using regular lime juice, the amount should be increased to 2⁄3 or even 3⁄4 cup (if you prefer a really strong flavor, and enjoy sour sweets). If using a roughly equal mix, as I did, 2⁄3 cup seems like a sensible middle ground.
Should we use lime zest? I don’t see why not; it should enhance the flavor even more (due to the oils in the zest). One reason not to use it would be if you dislike the resulting texture; if you want your filling to be totally smooth, skip the zest. (A compromise might be to mince the zest before adding it; this’ll make it less noticeable in the filling.) If using zest, 1 tbsp should do the trick (this should approximately equal the zest of one lime).
Other ingredients
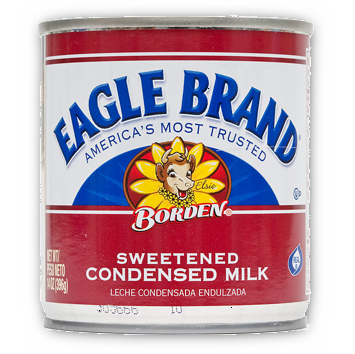
The sweetened condensed milk is a no-brainer: use one 14-oz. can of it. (Remember, buy the good stuff! No substitutes!)
That leaves the egg yolks. As we saw in our analysis above, the recipes really vary quite a bit; and more yolks should yield a smoother, richer, texture, and a deeper, more satisfying flavor, making the filling more custard-like. This is exactly what I want, so I’m going to err on the side of more yolks. How many, exactly? Well, the high end of the spread is 5 egg yolks; that recipe doesn’t specify egg size, but the most common egg size in the U.S. is large. I, on the other hand, usually buy extra-large eggs, which are 12% larger in volume. I am therefore going to use the yolks from four extra-large eggs.
Assembly
Do I want to beat the egg yolks before adding the other ingredients? I think I do. I don’t want the filling to be very dense; it should be a bit fluffy, and as smooth as possible.
Baking temperature & time
For the baking temperature, I’m going to stick with the clear standard here: 350°F. As for baking time—well, certainly we should expect that it’ll take about 10 minutes on the low end; at that point, it would be sensible to start checking the pie every couple of minutes, to make sure not to overbake it. It should be removed from the oven when just set (as we discussed in the analysis section).
Topping
As mentioned before, whipped cream is a simple thing. I’m not going to get fancy by adding mascarpone or any such thing. I will, however, use vanilla extract in the topping, because vanilla tremendously enhances the flavor of whipped cream. (If you do use vanilla extract, make sure it’s the real stuff! No “imitation vanilla extract”, no synthetics, etc.)
Post-processing
Chilling the pie after baking seems like a solid bet. I see no reason to skip this step.
Recipe
And here it is: the Key lime pie recipe I promised at the beginning of this post.
Equipment
- food processor
- small saucepan (or something else in which to melt butter)
- 9″ pie dish
- oven
- Microplane zester (or good box grater)
- mixing bowls (one medium, one large)
- measuring spoons
- liquid measuring cup
- electric hand mixer (or stand mixer; or, in a pinch, a good whisk and a strong arm)
- miscellaneous kitchen tools (knives, cutting board, etc.)
Ingredients
Note: All ingredients are listed in the order in which they’re to be added.
Crust
(click to enlarge)
- 11 graham crackers
- 5 tbsp dark brown sugar
- 5 tbsp butter
Filling
(click to enlarge)
- 4 extra-large egg yolks
- 2⁄3 cup lime juice
Alternatively: 1⁄2 cup Key lime juice - 14 oz (i.e., 1 can) sweetened condensed milk
- 1 tbsp lime zest, minced
Topping
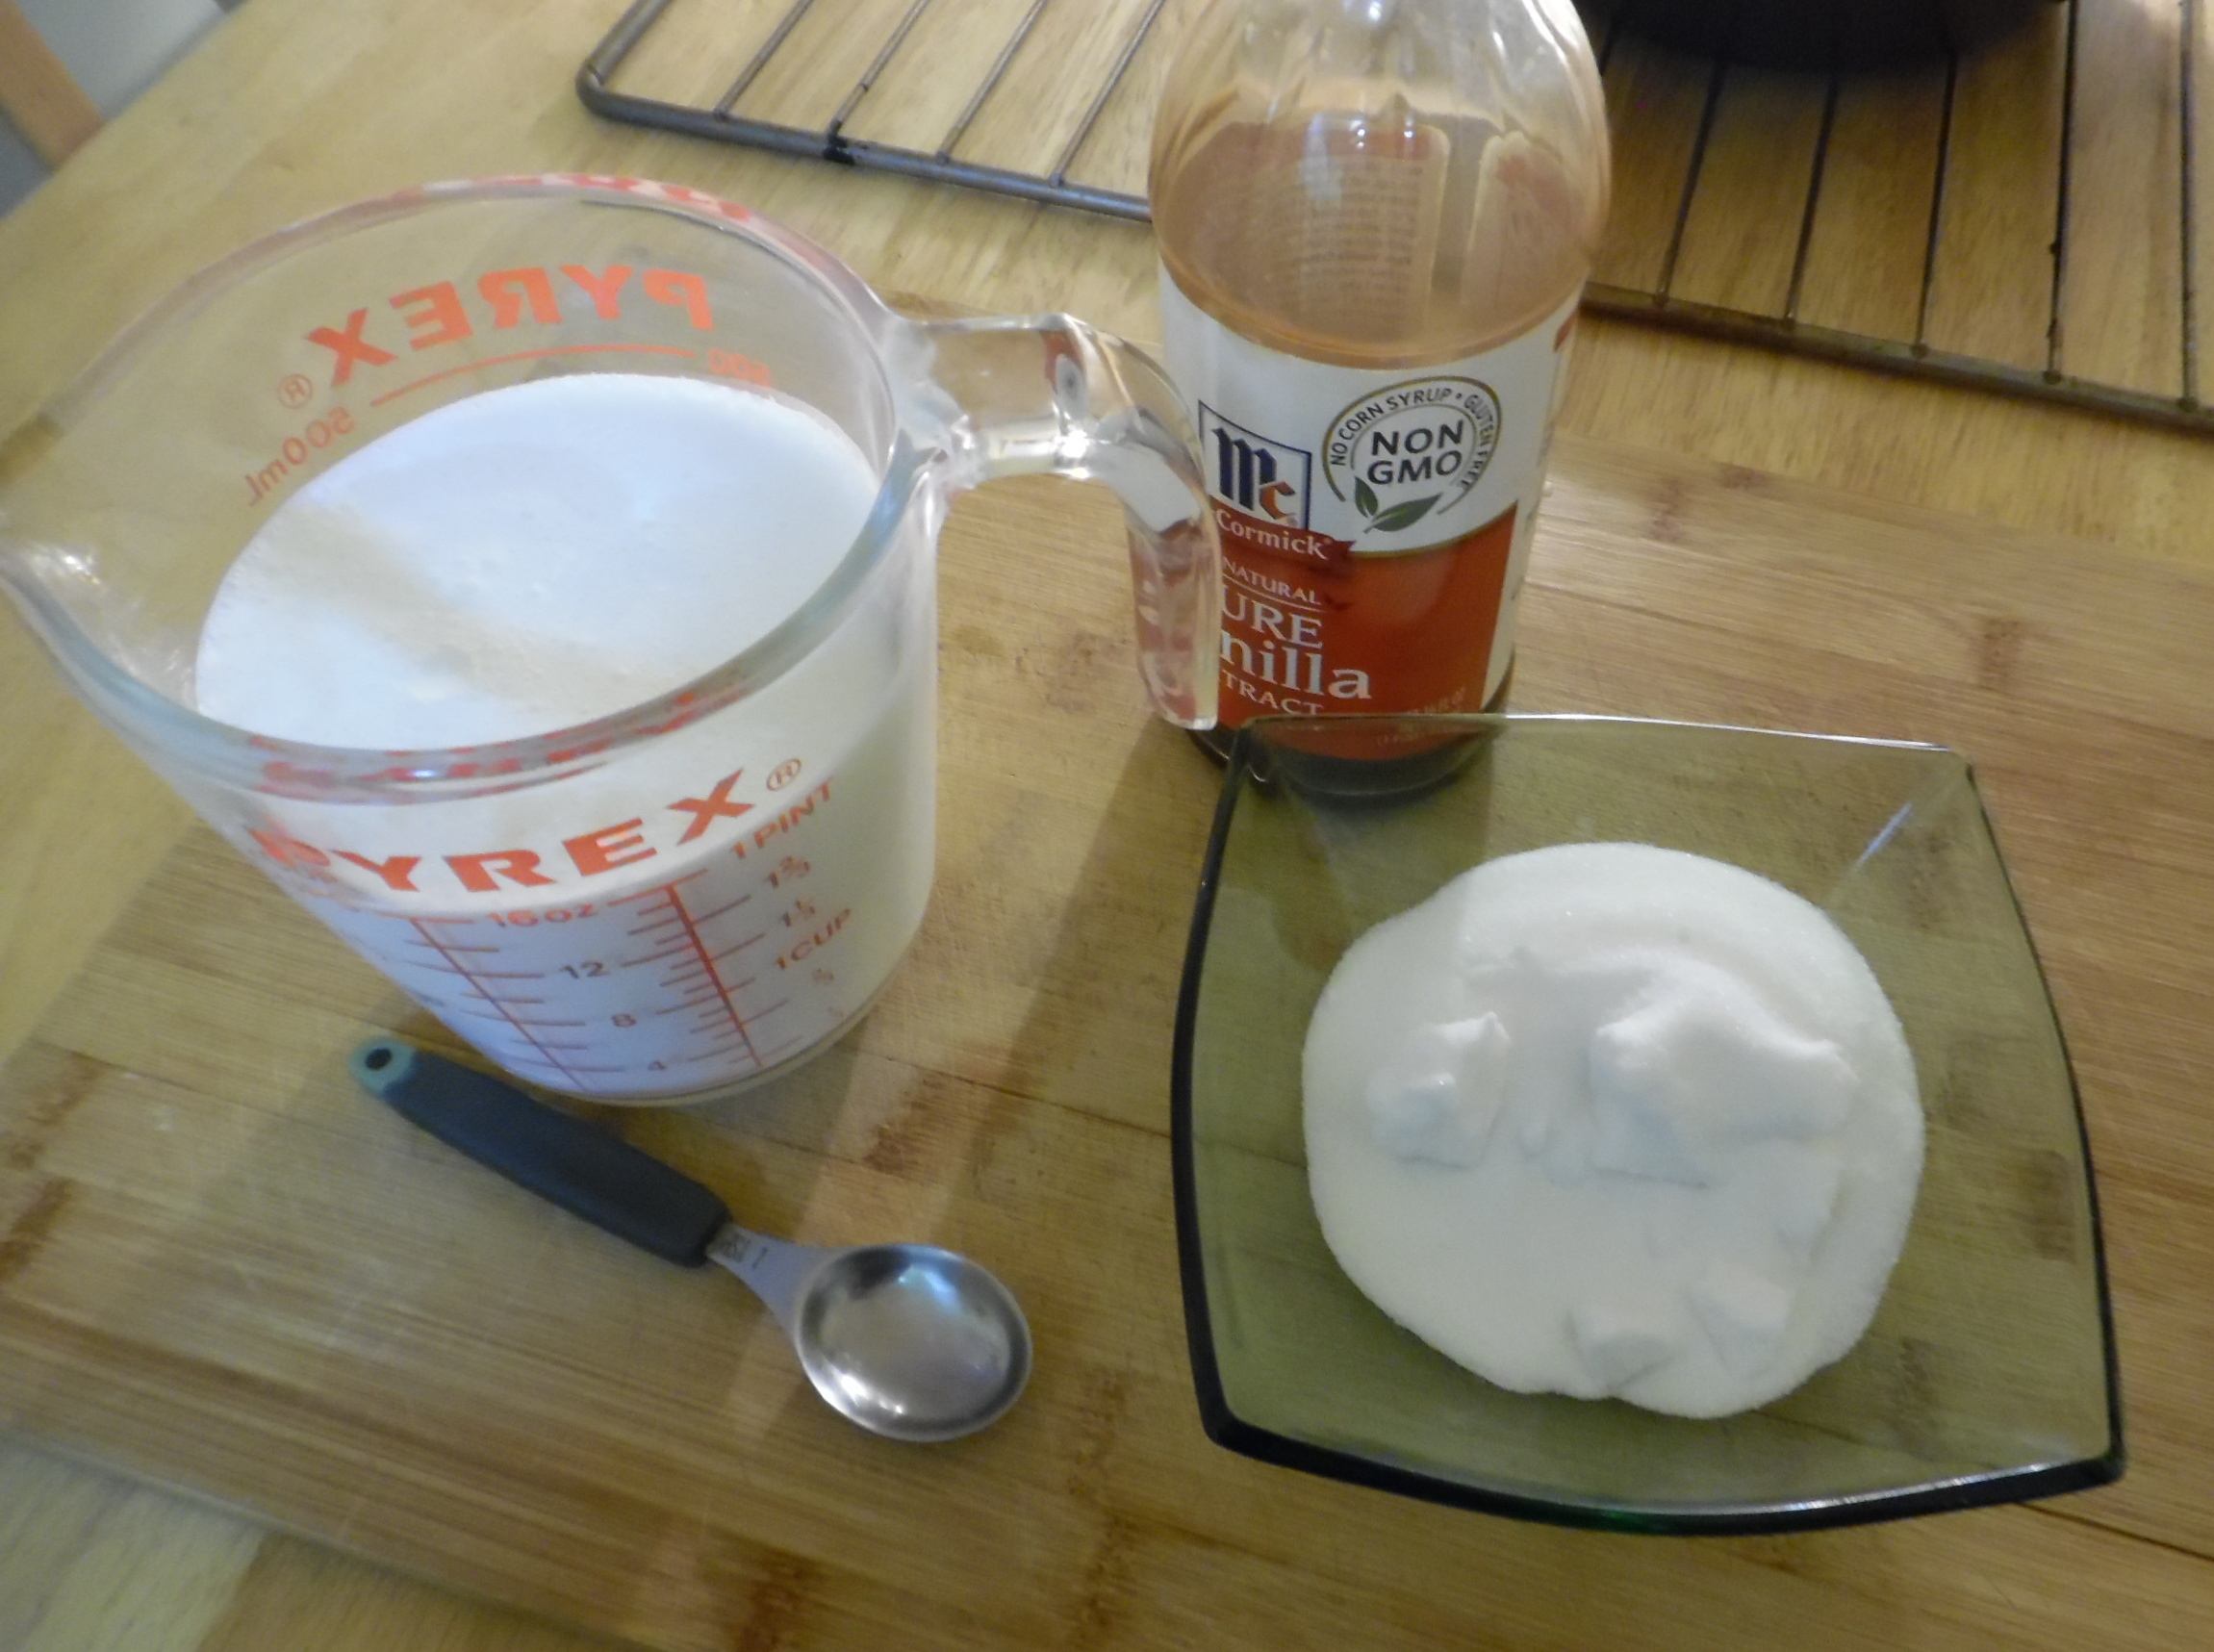
(click to enlarge)
- 2 cups heavy cream
- 1⁄3 cup granulated sugar
- 2 tsp vanilla extract
- 1 tbsp lime zest (as garnish)
Instructions
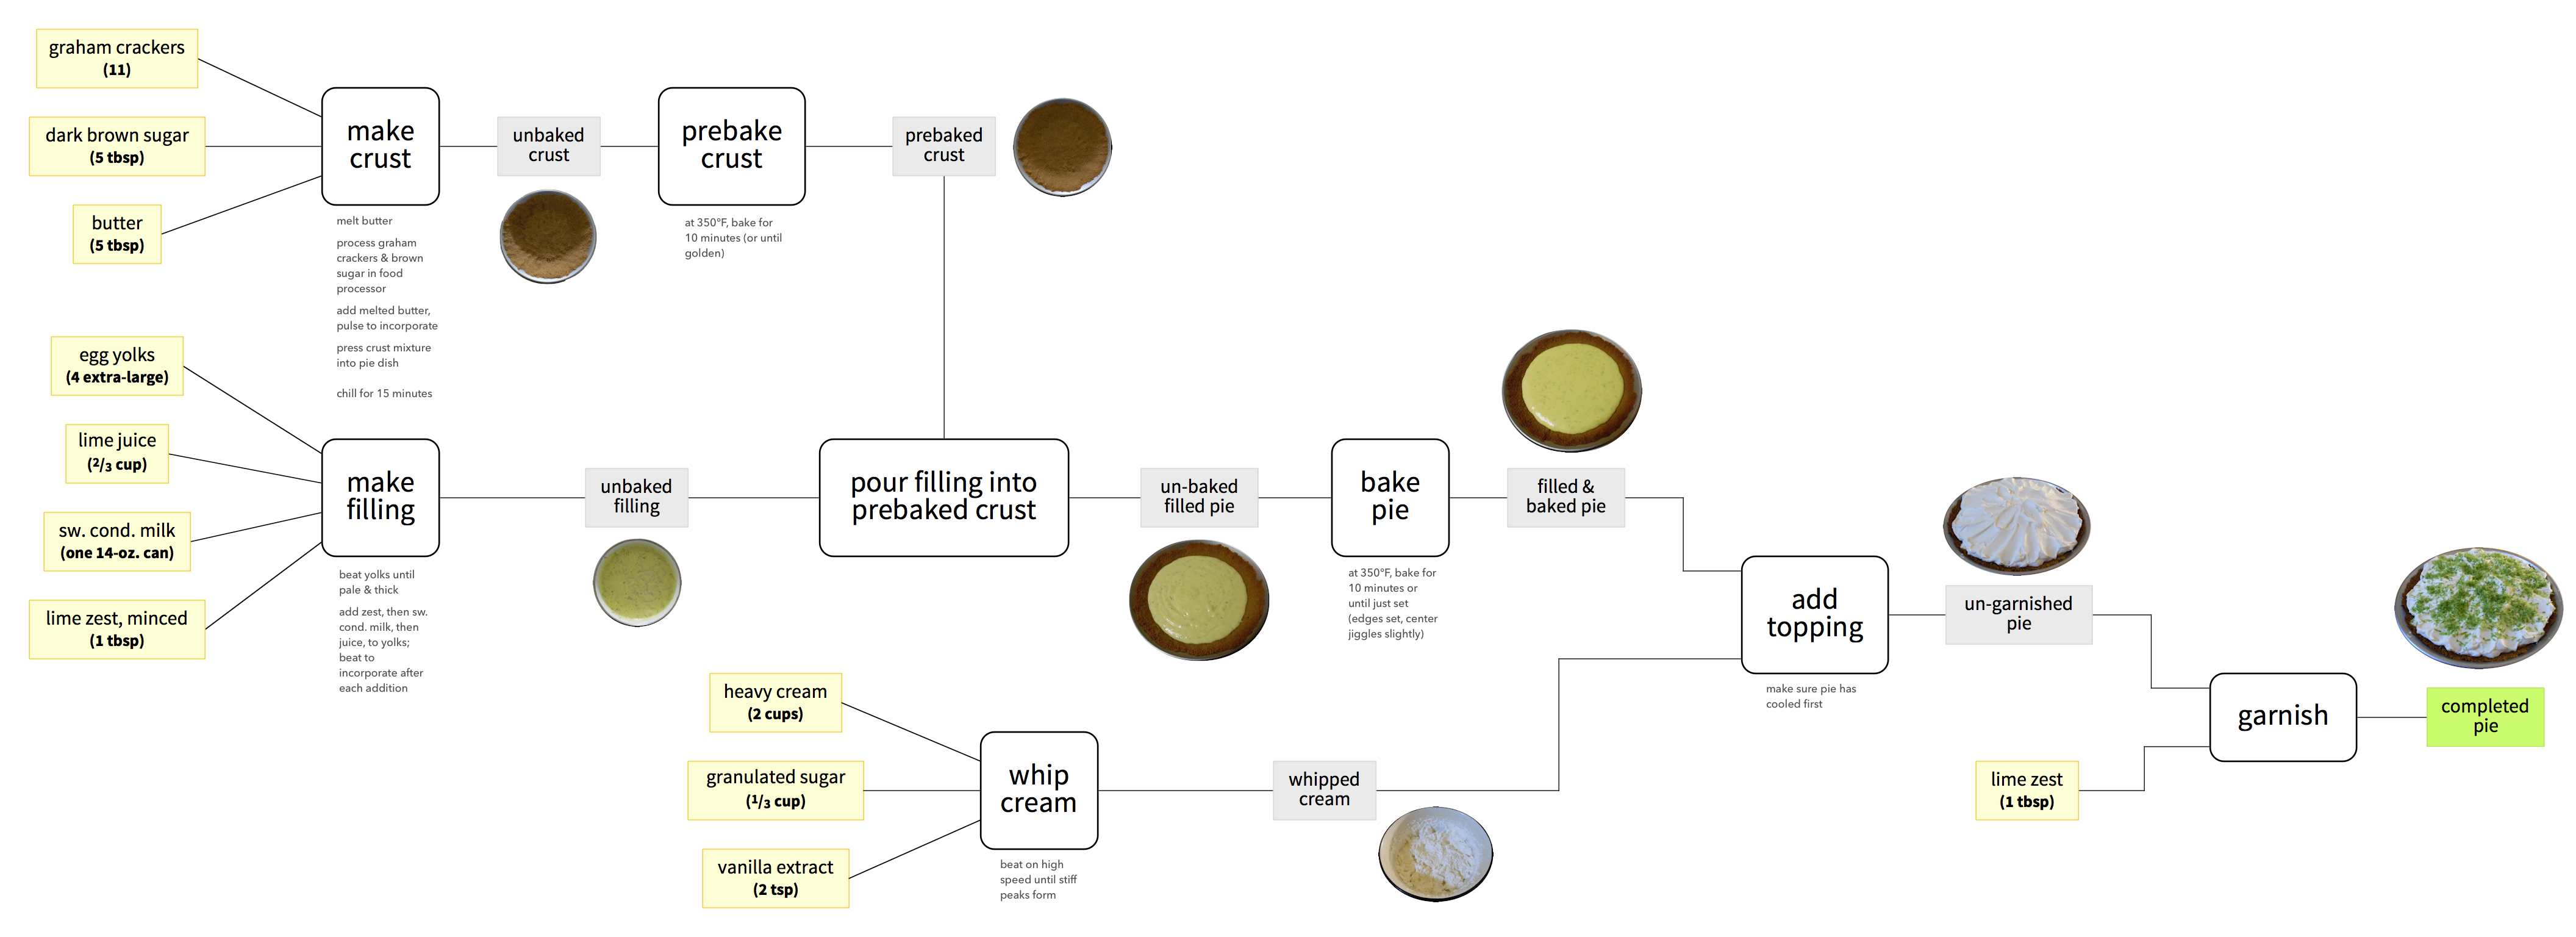
Flowchart of the process.
(click to enlarge)
Part I: Prepare the crust
 Butter, in saucepan.
 Butter, melted.
-
Graham crackers in food processor.
-
Graham crackers, processed.
-
After adding the melted butter.
-
Crust mixture in pie dish.
-
After pressing the crust mixture into the pan.
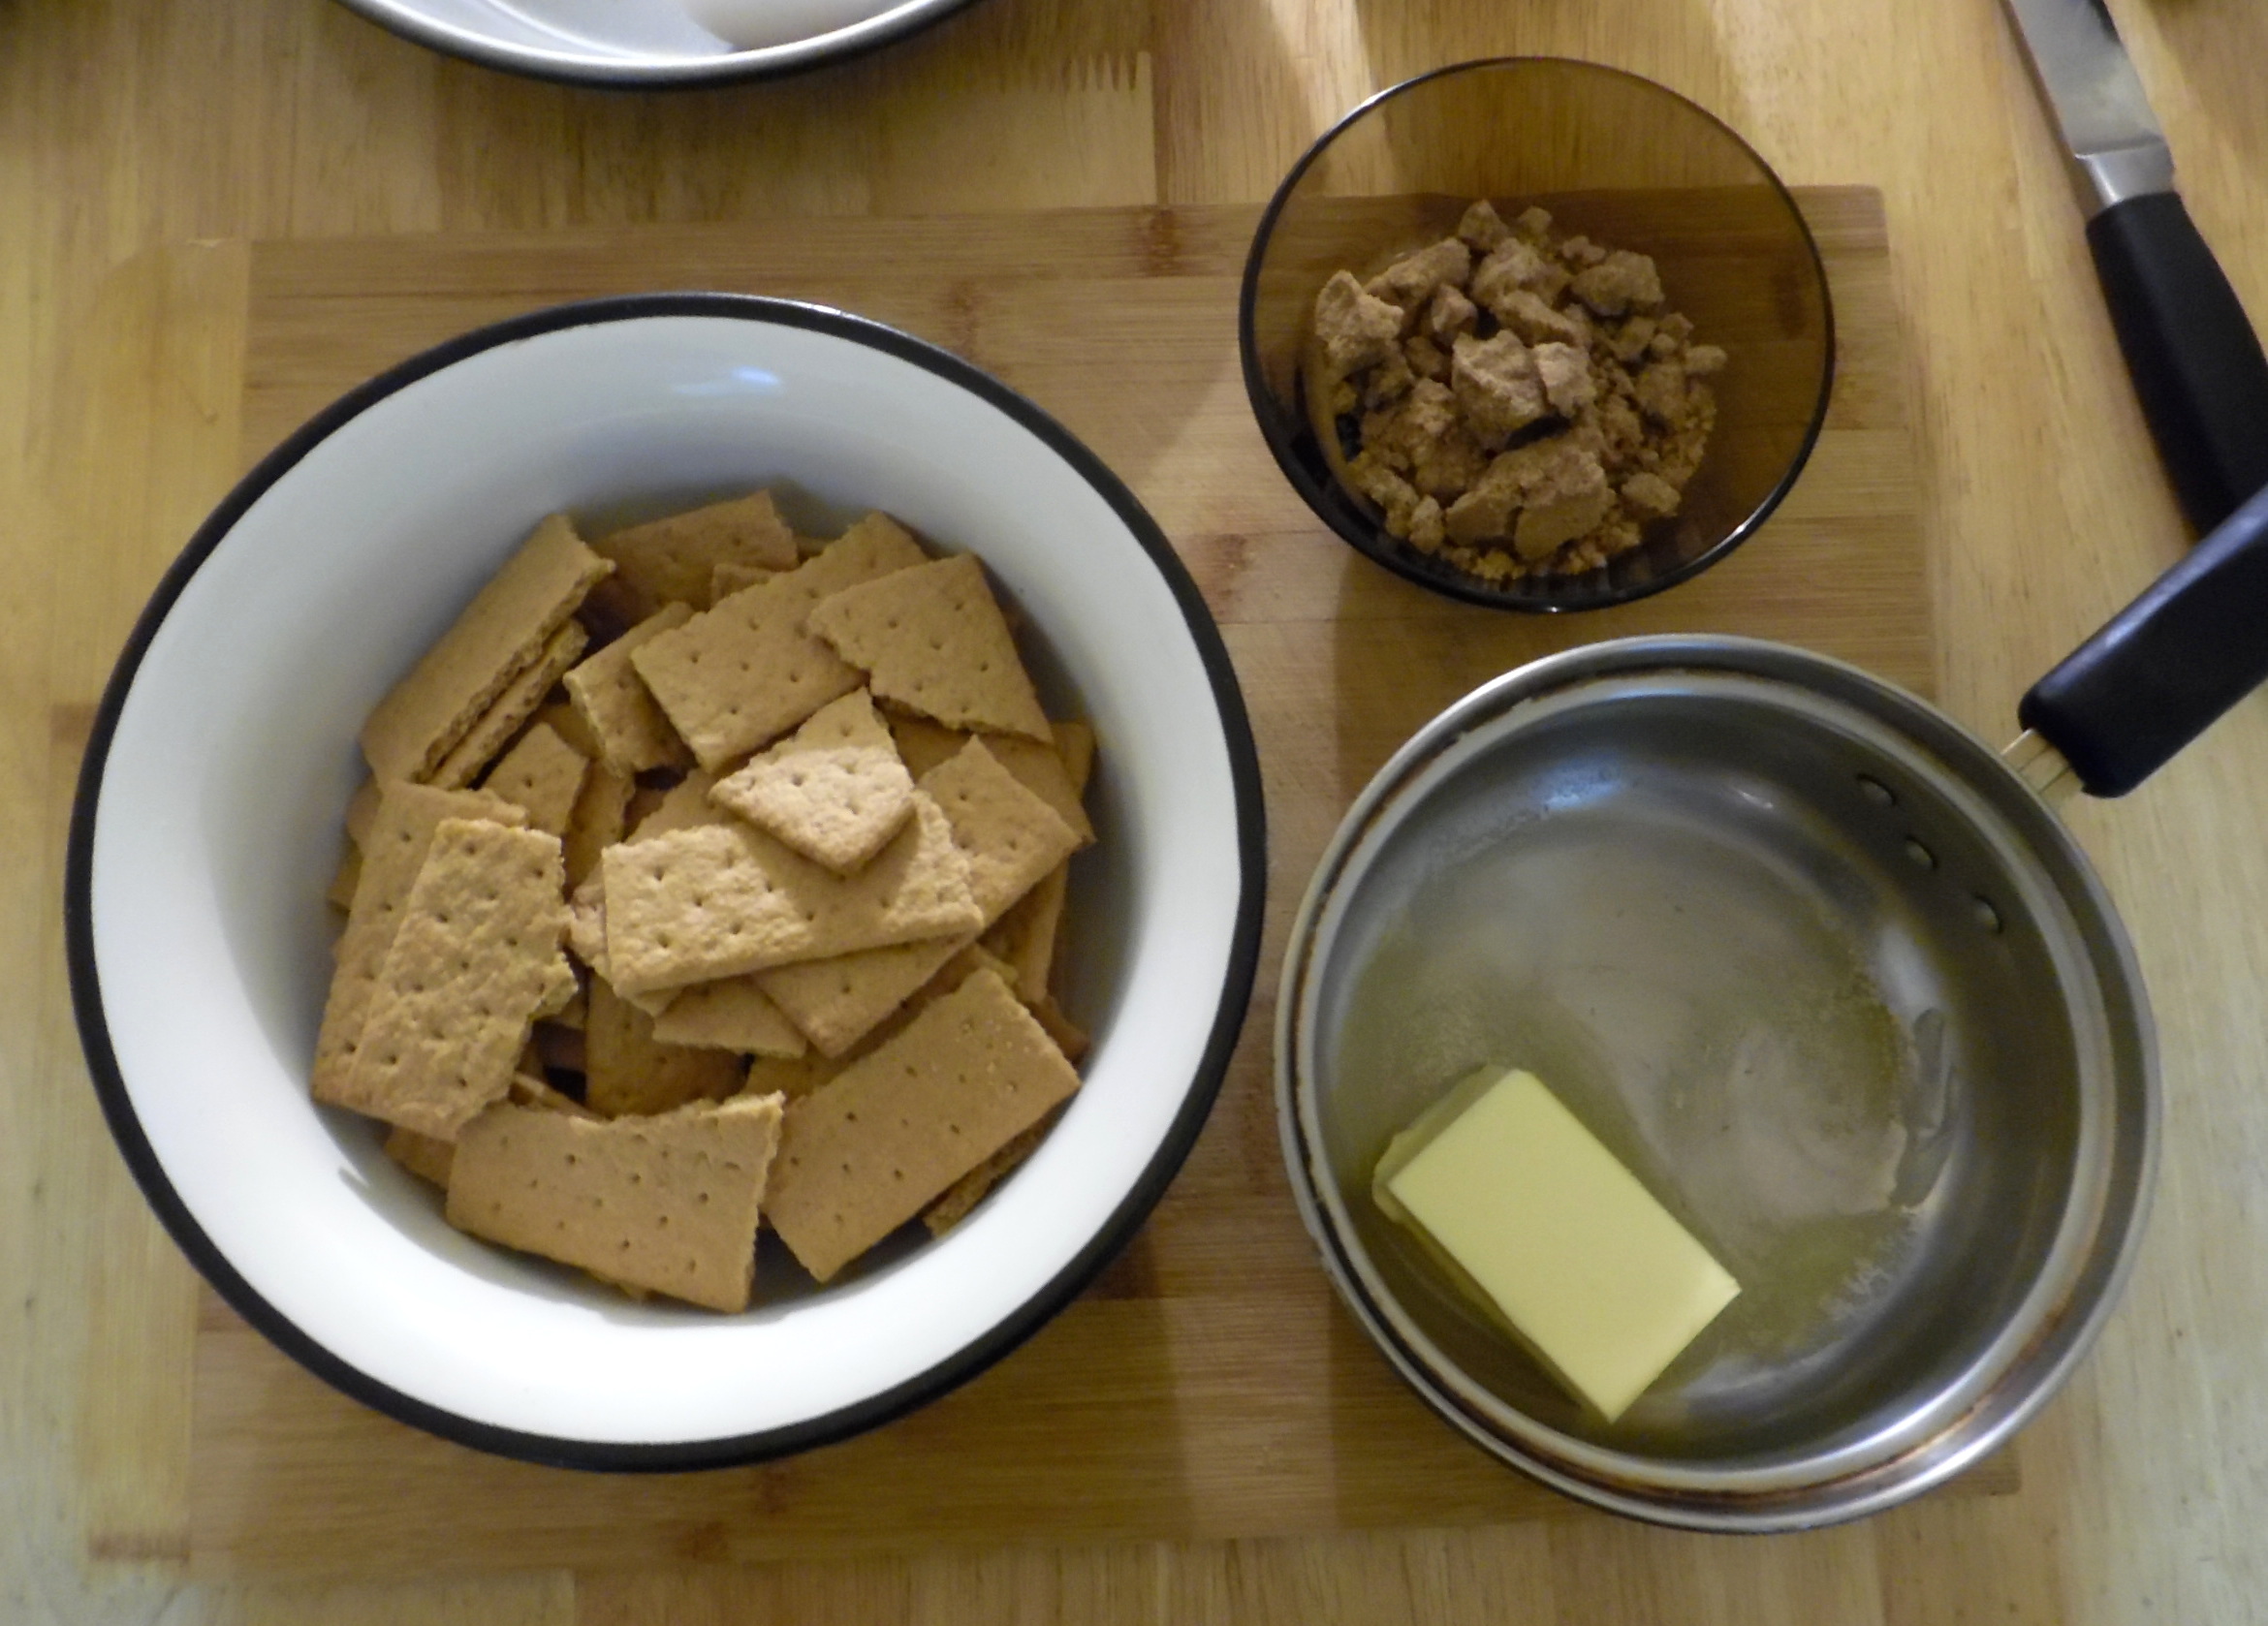
- Melt the 5 tbsp butter on low heat; remove from heat and set aside.
- In a food processor, process the 11 graham crackers with the 5 tbsp dark brown sugar into fine crumbs.
- Add the melted butter to the food processor; process until fully incorporated.
- Turn out the crust mixture into a 9″ pie dish. Press the crust into bottom and sides of pie dish.
- Place crust in refrigerator to chill for approximately 15 minutes. Set oven to 350°F, to preheat.
Part II: Begin preparing the filling
While the crust is chilling and the oven preheating, start working on the filling:
 Zesting the limes.
-
Limes quartered for juicing.
") Squeezed lime juice. (Not enough!)
Squeezed lime juice. (Not enough!)
-
Bottled Key lime juice, to supplement squeezed.
-
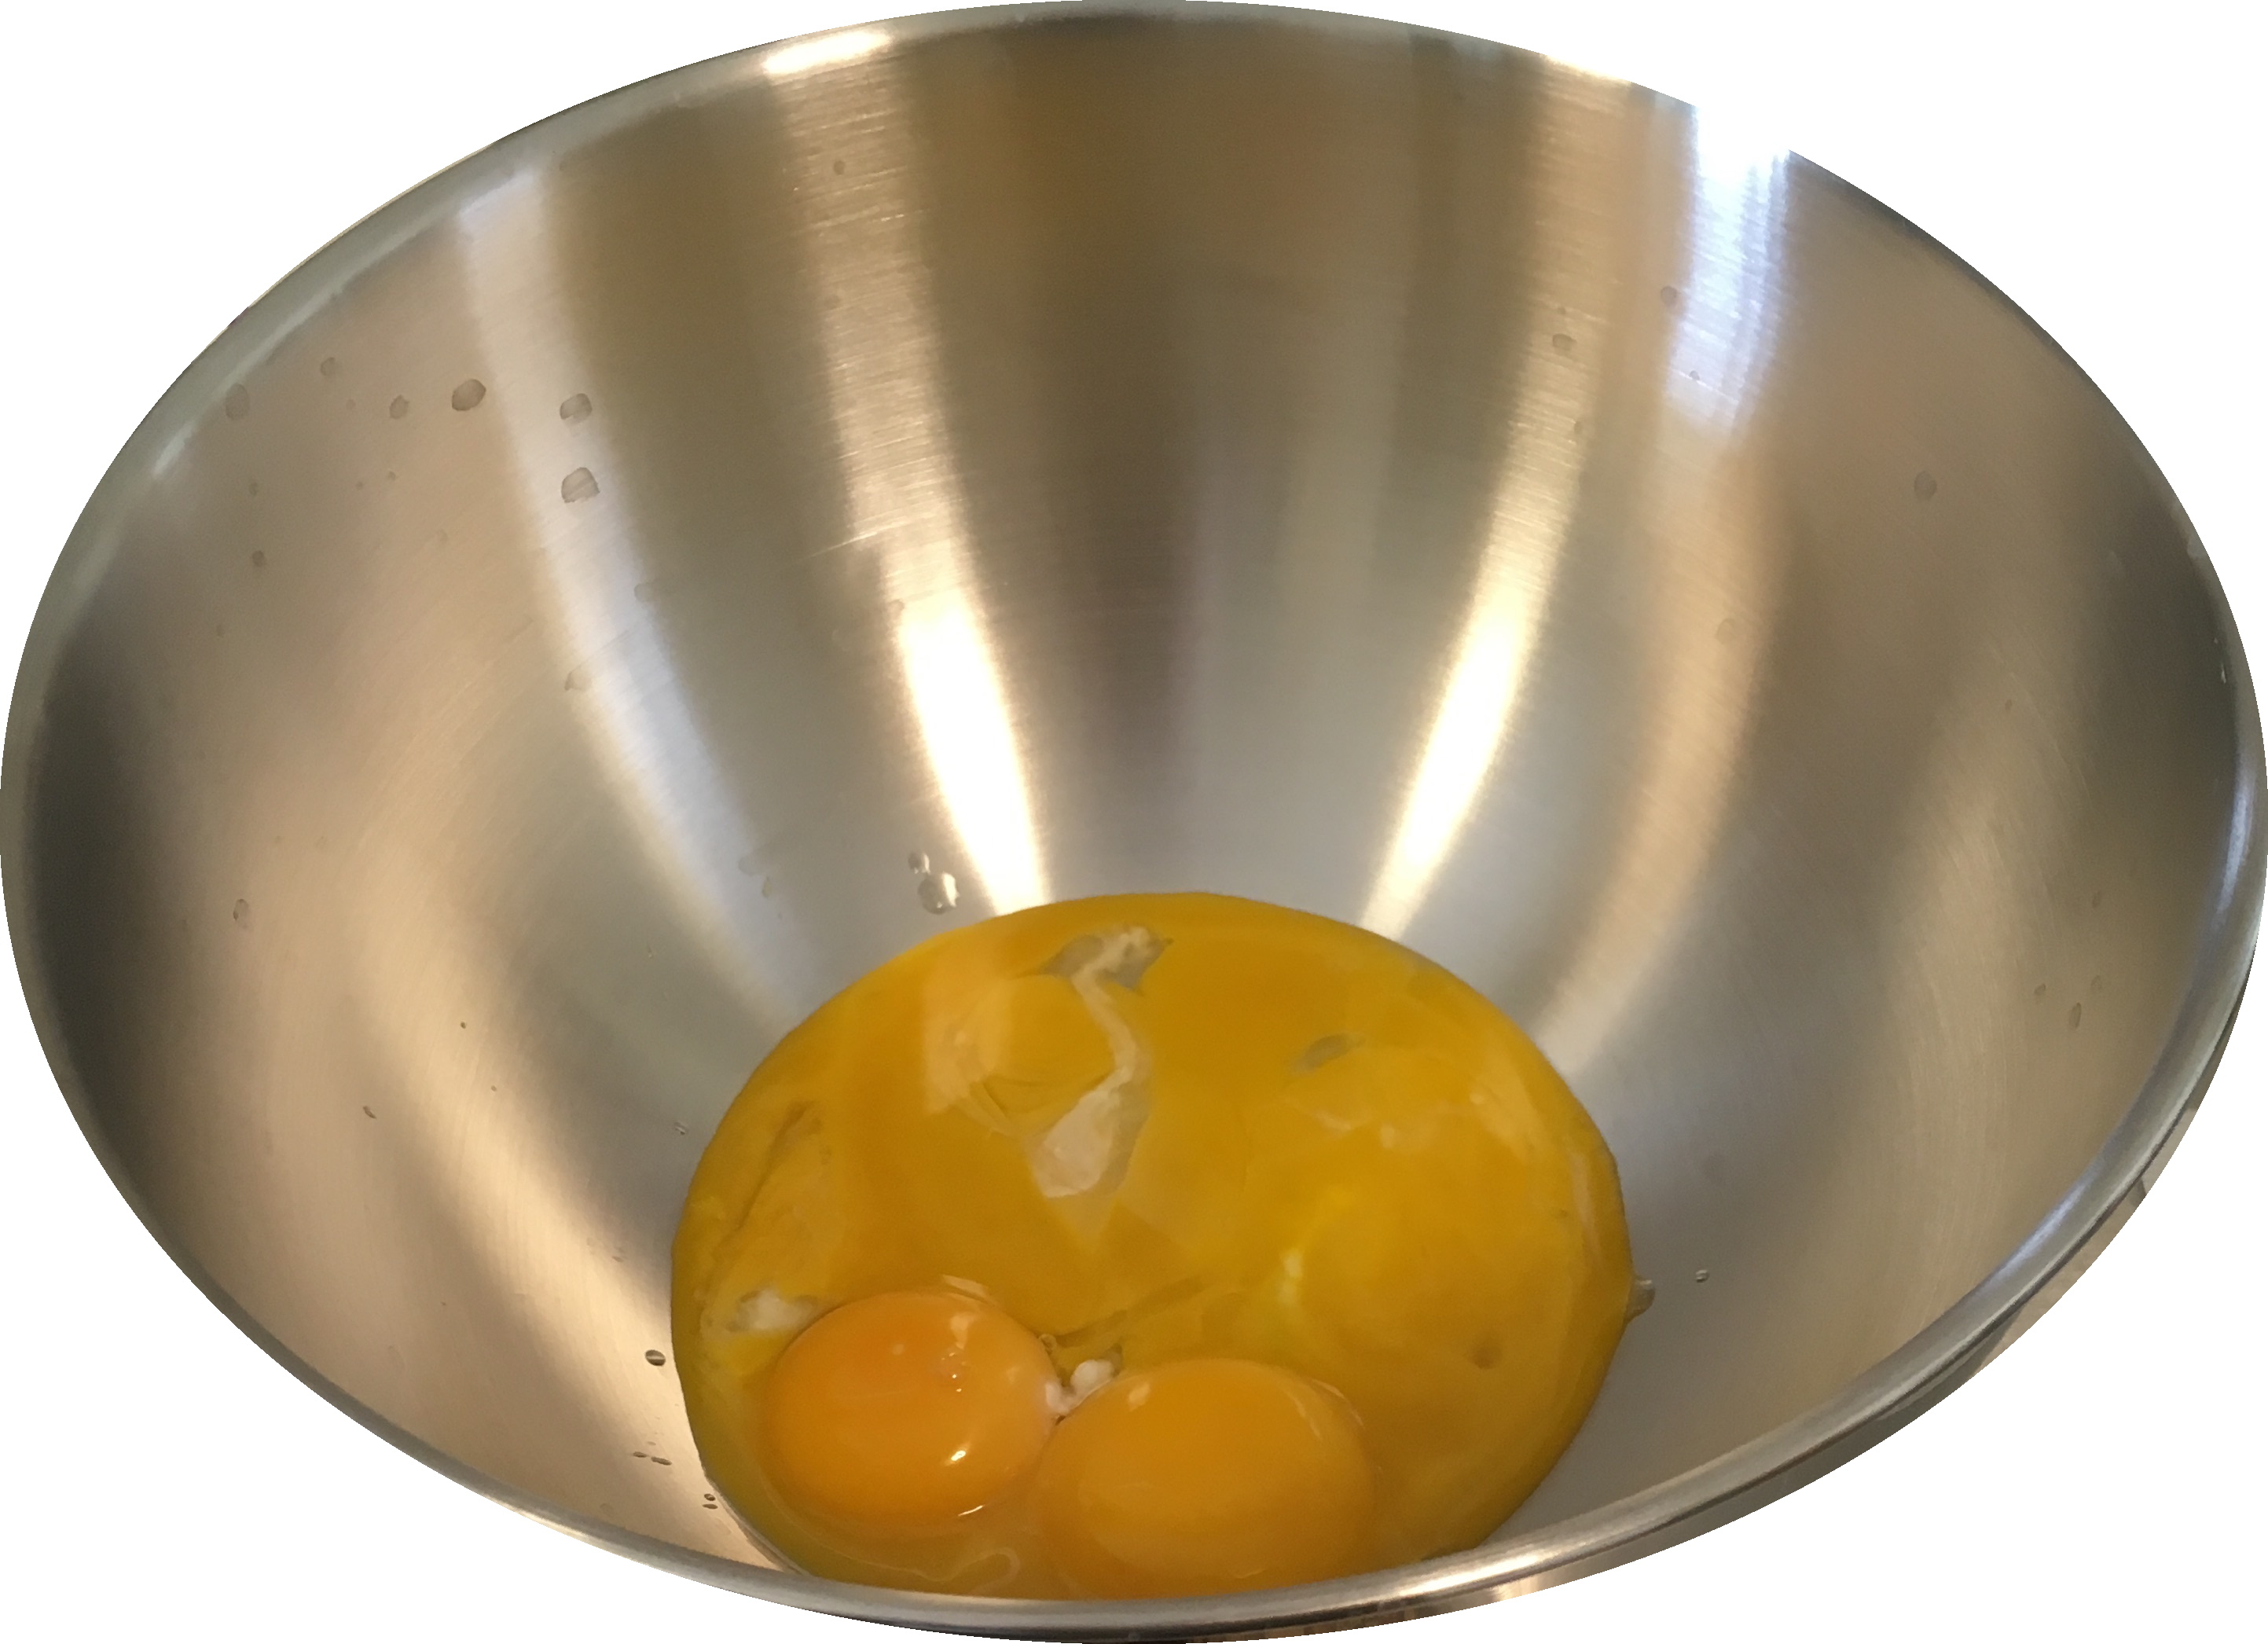
Four extra-large egg yolks.
 Opened bucket of sweetened condensed milk.
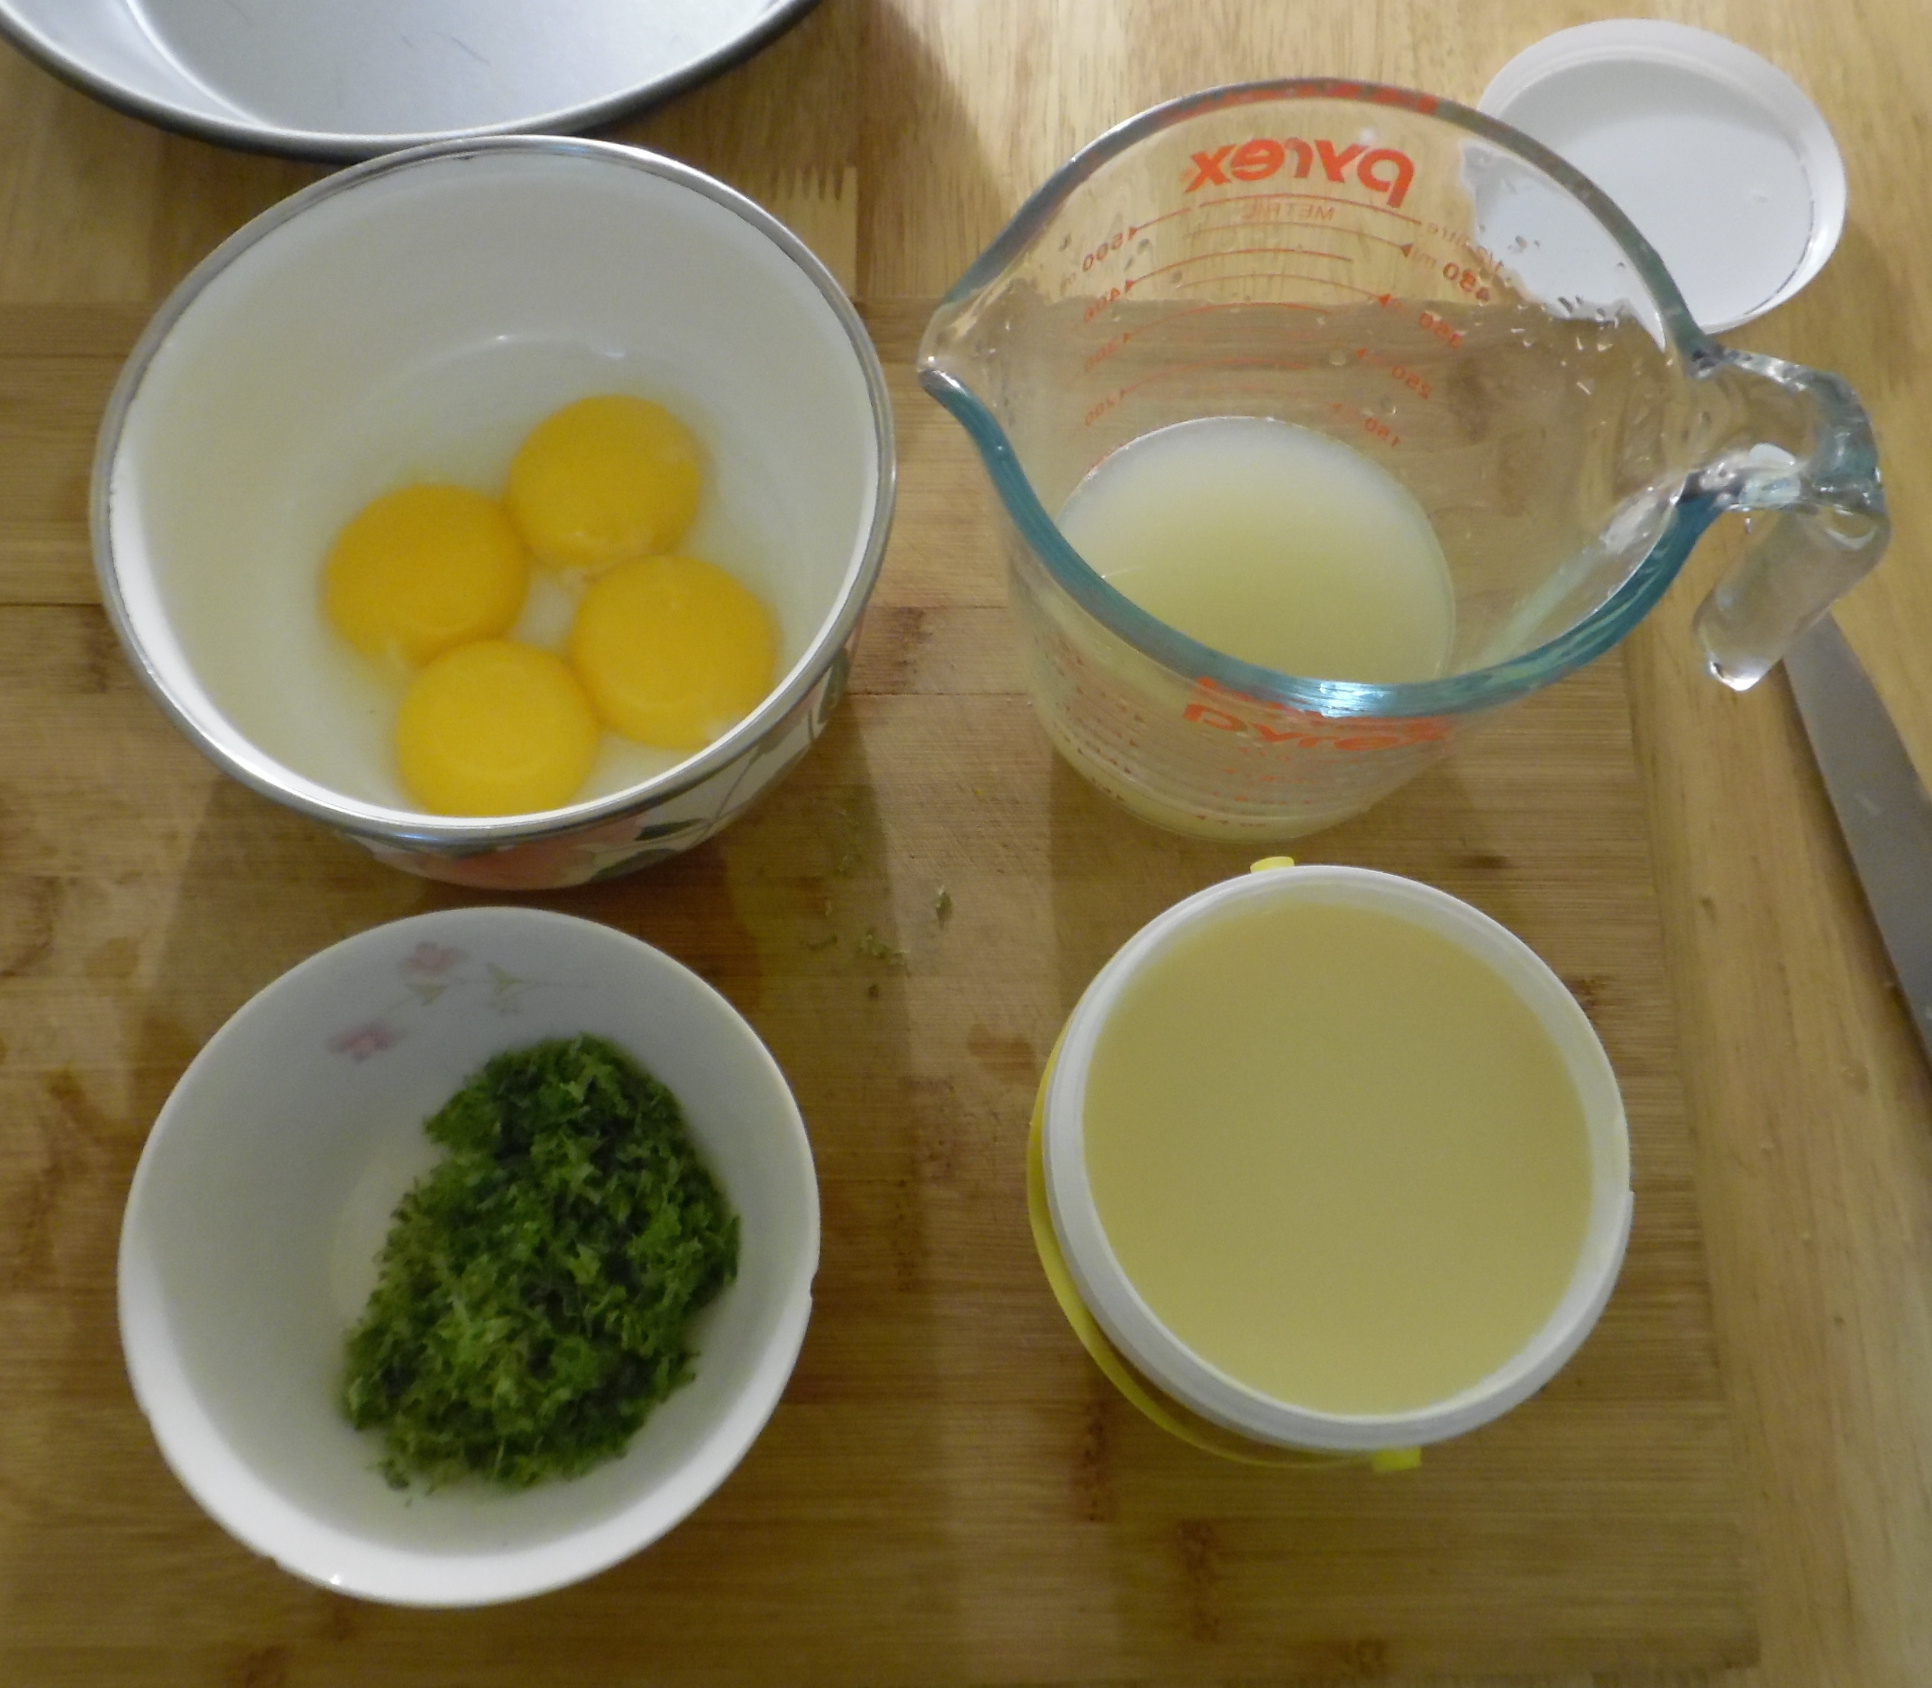
- Zest the limes.
- Halve (or quarter) and juice the limes. Make sure you have the right amount of juice (2⁄3 cup if using regular lime juice, or 1⁄2 cup if using Key lime juice).
- Separate the eggs; place the (four extra-large) yolks into medium mixing bowl. (Preserve the whites for another use.)
- Open the can of sweetened condensed milk.
Part III: Prebake the crust
- Remove crust from refrigerator (where it has now been chilling for about 15 minutes), and put it in the oven. Bake for 10 minutes (or until golden).
Part IV: Mix the filling
While the crust is baking, prepare the filling mixture:
-
Egg yolks before beating.
-
Egg yolks after beating (note the color).
-
Adding the lime zest.
-
Adding sweetened condensed milk and lime juice.
- Using the hand mixer with the whisk attachment(s), beat the 4 extra-large egg yolks on high speed until light and thick.
- Add the 1 tbsp lime zest to egg yolks, and beat on low speed until incorporate.
- Add the 14 oz. sweetened condensed milk and 2⁄3 cup lime juice; beat on low speed until just incorporated.
Part V: Fill and bake the pie
-
Prebaked crust.
-
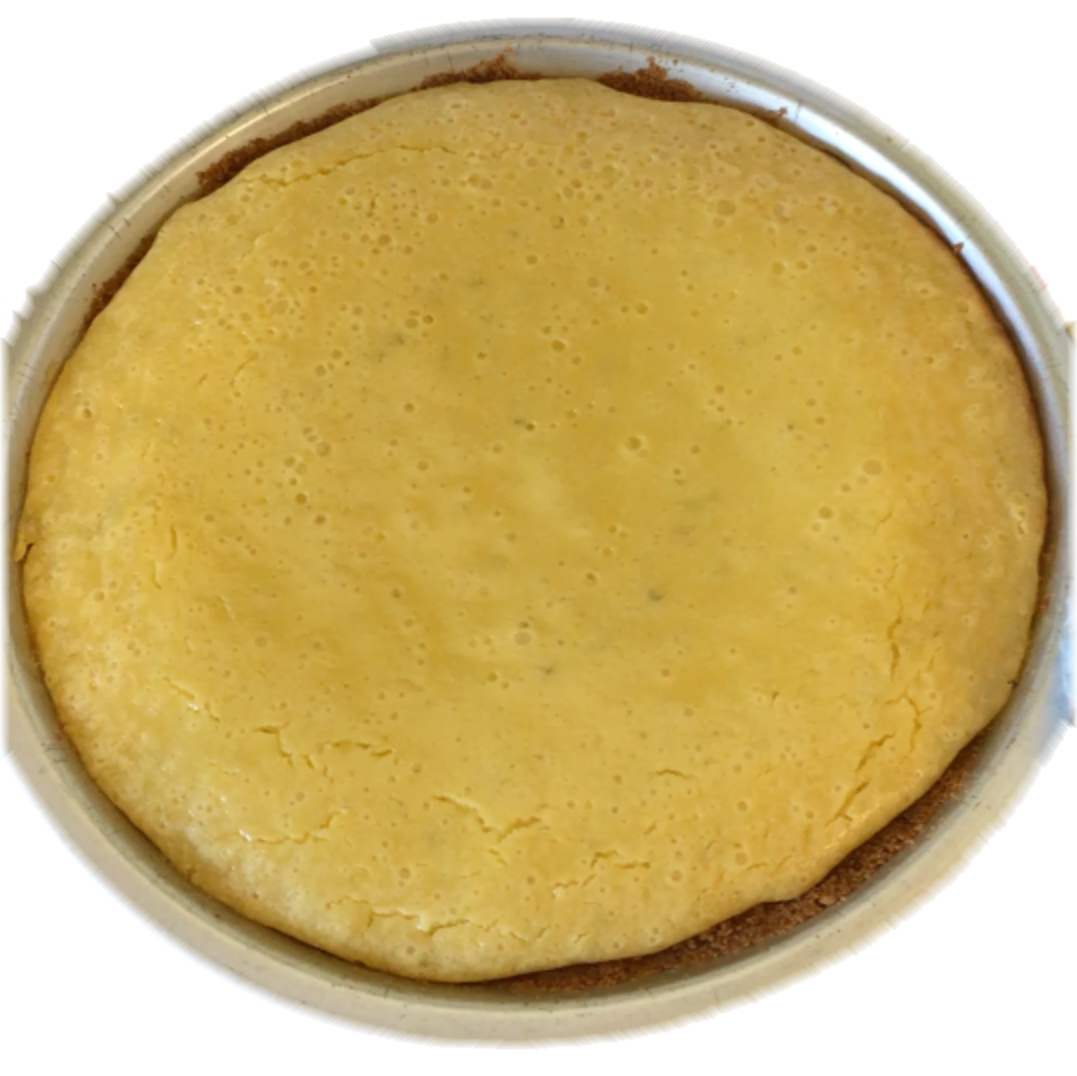
Filling, poured into prebaked crust.
 Filling after baking.
- Remove the crust from the oven once it’s done prebaking. (At this point, the filling mixture should be done.)
- Pour filling mixture into prebaked pie crust.
- Put filled pie back in the oven; bake for 10 minutes, or until just set (it should jiggle slightly in the middle, while the edges should be fully set).
- Remove pie from oven, and set on rack to cool.
Part VI: Make the topping
Make whipped cream. Use your preferred method, or as follows:
-
Ingredients combined in large mixing bowl.
 Beaten to “stiff peaks” stage.
- Combine the 2 cups heavy cream, 1⁄3 cup white sugar, and 2 tsp vanilla extract in a large bowl.
- With electric hand mixer, beat cream on high speed until stiff peaks form.
Part VII: Assemble the pie
-
Topping spread over filled and cooled pie.
-
Garnished with lime zest.
- Spread whipped cream over the cooled pie.
- Garnish with lime zest.
Part VIII: Chill and enjoy!
- Chill pie in the fridge for at least 4 hours (preferably overnight).
- Eat the pie!
What can go wrong
The Dessert Bible includes a “What Can Go Wrong” section after many of the recipes therein; I have always found these to be tremendously useful.
Fortunately for me (and for anyone reading this and thinking of trying the recipe), certain readers of this blog have already tried their hand at making the pie in accordance with the instructions above. I am given to understand that the results were delicious—but flawed. (Don’t get discouraged, anonymous blog readers! Keep trying! The world is better for your efforts!) Here, then are some things that can go wrong when making a Cognitive Pie™ Key lime pie.
Inadequate egg separation
Perfectly separating yolks from whites is tricky. Making sure no yolk gets into the whites (critical if you’re making meringue, for instance) takes care but is doable; making sure no white gets into the yolks is impossible. Still, it’s very possible to minimize how much egg white ends up in your yolks—and it’s definitely something you want to aim for, in recipes like this.
This is good:
(click to enlarge)
This is not quite as good:
(click to enlarge)
What happens if whites get into the yolks? The texture suffers. It’ll be a bit more rubbery and less smooth—not ruinous, but not perfect. To avoid this, take care when separating the eggs. One trick that helps here is to make sure the eggs are cold (i.e., right out of the fridge) when you separate them.
Not beating the egg yolks well enough
This is step #11 in the recipe. You want the yolks to be very thick and pale before you add the other ingredients. (If you try to beat the yolks after you’ve already added the lime juice or sweetened condensed milk, it won’t work.)
If you don’t do this quite well enough, it’s not the end of the world… but the filling will be denser, and not as smooth and “custardy”, as it could be.
Overbeating the filling
Counterintuitive though it might be, given the preceding heading, it’s true: you can overbeat Key lime pie filling. The trick is, after you’ve added the juice, zest, and sweetened condensed milk to the egg yolks—then you want to minimize how much you beat them. Mix just to incorporate fully—no more.
Otherwise, this can happen:
(click to enlarge)
Yes, the filling bubbles and cracks. You want the filling to be smooth and without any bubbles or cracks when it’s baked. So be gentle with that filling, once you’ve added things to the beaten yolks!
Conclusion
We started with a general approach to developing procedural knowledge: the “Saturation, Distillation, Improvisation” (or ‘SDI’) method.
Building on the SDI concept, we refined it into a procedure for developing recipes, which goes like this:
- Decide on a type of dish to develop a recipe for.
- Gather a handful (perhaps a half-dozen or so) recipes from various sources (via casual googling, perhaps).
- Build a table that provides a quick, at-a-glance comparison of the key parts of each recipe (both the ingredients and all relevant elements of the process).
- Identify commonalities and differences between the recipes. Note ranges of variation. Identify clear outliers.
- Examine each dimension of variation, aiming to understand the reason behind each similarity and each range of variation. Try to understand the role that each part (each ingredient and each step in the procedure) of the recipe plays.
- Go through each element of the recipe again, choosing a point along the dimension of variation. Make use of your background knowledge, your understanding of relevant situational factors, and your personal preferences.
- Assemble the synthesized elements into a complete recipe.
- Try out the recipe; evaluate results; iterate. (This is not part of the technique per se, but is a crucial follow-up step in practice.)
We then applied this procedure to the task of developing an original recipe for a popular dessert: Key lime pie.
Finally, recipe in hand, we (well, I) baked the pie. The result was delicious!
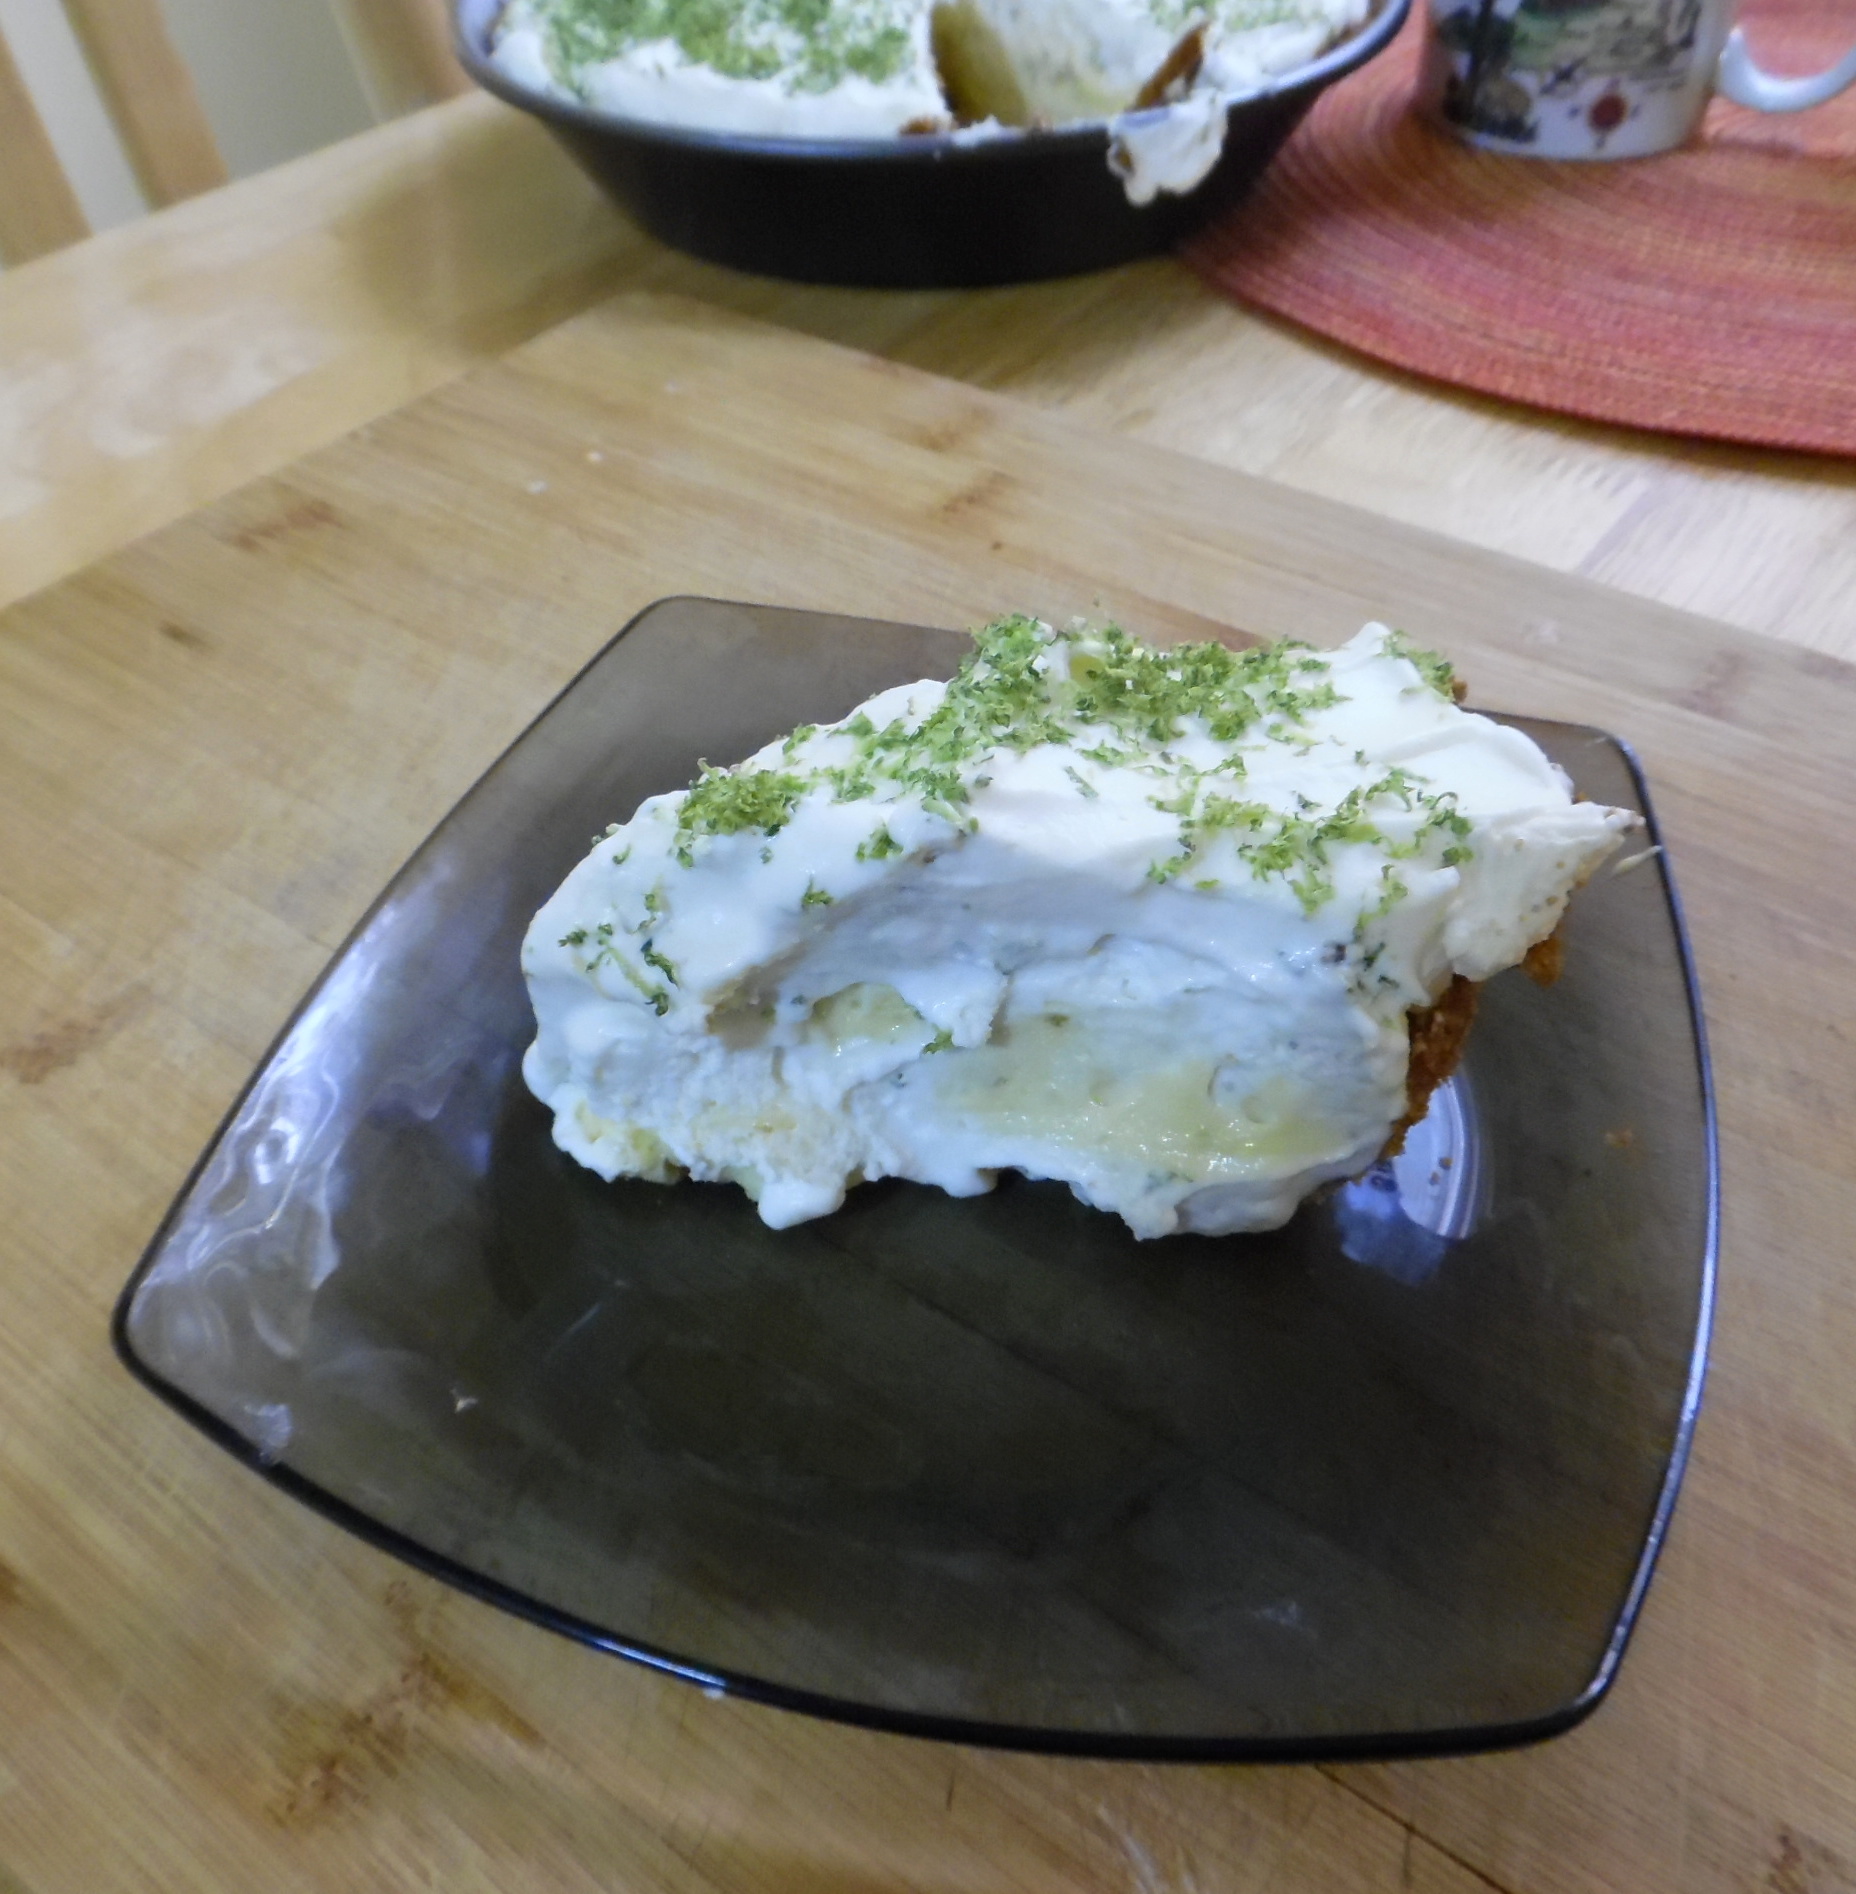
Slice of Key lime pie.
(click to enlarge)
1 The recipe says to use “1⁄3 of a 1 lb. box” of graham crackers. This seems to be an approximation; a standard box of Nabisco Original graham crackers is 14.4 oz., and contains three sealed packets of graham crackers?, each of which contains 9 individual crackers. ⇑
2 Most of these recipes don’t tell you to put salt in the crust. But the crust does have butter… what kind of butter? Well, just butter; or perhaps, ‘regular’ butter.
… it turns out that some people think of salted butter as ‘regular butter’.
AAAAAARRGGGGHHH.
This sort of thing should really be illegal. ⇑
3 Yes, this woman seriously tells you to put eighteen graham crackers in the crust. No, the recipe isn’t for two pies, or one super-sized pie. ⇑
4 The Pioneer Woman gives the whipped cream topping part of the recipe only approximately; no exact measurements are given in the ingredients list. Presumably, she assumes that anyone who likes whipped cream already knows how to make it, and how they like it. ⇑
5 The Pioneer Woman does not specify the size of the pan she uses, but 9″ is the most commonly used size of pie pan. ⇑
6 This is not a typo. The recipe really says “3 cups sweetened condensed milk”. ⇑
7 Most of the recipes, when specifying baking time, qualify it with “or until golden and set” (or a similar qualitative description). ⇑
8 Just as with the crust, most of the recipes include a qualitative description of how long to bake the filling in addition to a literal baking time, which in this case is usually some variation on “until the filling is just set”. ⇑
9 Indeed, any pie that doesn’t contain both of these ingredients is, by definition, not a Key lime pie. ⇑
10 Mascarpone is probably best known as a key ingredient in tiramisu. ⇑
11 What’s the difference between a Key lime and a regular lime, anyway? As usual, the internet can tell you all about it, but the gist is: they’re two different species (Key limes are C. aurantifolia, regular—a.k.a. ‘Persian’—limes are C. latifolia). Key limes are smaller and more acidic than Persian limes. ⇑
12 I held out for as long as I could, but in the end, I couldn’t resist making this pun. ⇑
13 BEWARE when buying sweetened condensed milk!! Read the ingredients list! There are brands of so-called “sweetened condensed filled milk product” (or some similar evasive terminology), which contain garbage like hydrogenated soybean oil and other distinctly non-milk substances. Avoid these at all costs!
What you want is a product that contains two ingredients only: milk, and sugar. (Sometimes there are multiple forms of sugar: sucrose and lactose, for instance. This is acceptable.) It is also ok if the sweetened condensed milk you buy also has cream.
Avoid boiled sweetened condensed milk! (This is also sometimes known as dulce de leche.) This product can also be delicious… but is totally inappropriate for this recipe, and will ruin your pie if you try to use it in place of regular, non-boiled sweetened condensed milk. ⇑
14 It is possible that the salt improves the flavor; the next time I make a Key lime pie, I’ll try it the other way. ⇑
In a recent comment, I approvingly cited a pair of cookbooks (Christopher Kimball’s Cook’s Bible and Dessert Bible), and said that—
This might’ve seemed to some folks to be a strange thing to say; what has cooking (or baking) to do with rationality (any more than any other activity)? In answer to that potential question, here’s a list of some of the rationality-related concepts that appear in this post (in addition to the central concept—the question of public epistemology—which the post is explicitly about):
The necessity of domain knowledge (a.k.a. “expert knowledge” or “background knowledge”) for reasoning about some domain or topic
The difficulty of converting qualitative information into quantitative information
The indispensability of learning by doing vs. the benefit of transmissible instruction
Chesterton’s fences, and when it is ok to knock them down
Different types of optimality criteria
Are there others I missed?
Update: one of the readers of my blog has posted this excellent response post of his own, in which he explores the “experiment with variations” part of the SDI method I described. He writes:
I recommend reading his post in its entirety; it’s a great case study of improving one’s procedural knowledge / skills through iteration, and showcases the engaging and rewarding qualities of cooking that I discussed in a previous comment.
Update: I’ve added an infographic to the recipe writeup, which summarizes the process in a nice visual way (inspired by this John Baez post; h/t gwern):
(TL;DR: good post OP)
I liked this post, and it seems to formalize my existing food-related intuitions reasonably well as well as suggesting useful new methods. Also, it has prompted me to subscribe to the author’s blog’s RSS feed.
Meta note: I wanted to cross-post the entirety of this post here, rather than just making it a link post. Unfortunately, it turned out that doing so would be a massive amount of work—I’d have to do a whole lot of manual conversion of the markup, etc.—and many features of the original post would be simply impossible to convert (the slide galleries, the click-to-enlarge-images feature, the footnotes and backreferences, the nicely-formatted table, etc.).
I would love to see LW2 (or, as I guess I should now say, simply ‘LW’) somehow solve this issue. (I have some ideas for how this might be approached, but none of them are simple, alas…) It seems to me that encouraging cross-posting is a desirable goal.
Was it a markdown post or some other formatting?
Near future we’ll have deployed the markdown post editor. (I think we also have some ways to html imports but they’re something we’re a bit cautious about)
As Oliver said, it’s a lot more than just markup… there’s custom CSS, and even Javascript.
Is it at all possible to allow embedding of entire pages, such as via
<object>tags? (In my case, I would then create a special view (toggled via a URL parameter) onto the blog post page—something my blogging software lets me do easily—that would show the content only, without the sidebar, comment section, site header, etc.; and then embed that view into the LW post.)Isn’t allowing <object> an invitation for XSS?
Also, at least for me, click-to-enlarge images and slide galleries weren’t essential to enjoying your post.
Good to hear! :)
(However, it really is a lot of different custom stuff.)
Yes, that’s true, but I am not suggesting allowing
<object>tags with arbitrary parameters—only specific ones (i.e., ones where thedataattribute is the URL of a trusted site). Then again, I am no security expert!With something like this, what seems like a good way to implement it is to have a “moderation queue” of some sort (akin to some blogs having a “comments must be approved to be posted” system). So a user who wants to use certain features (such as the aforesaid
<object>-based embedding) would post their post, and then it would sit in the mod queue until a moderator looked at it and verified that it wasn’t malicious, that the user in question was someone they trusted not to be malicious, etc.Anyway, I don’t insist that this solution is the best, or even good; if it can’t be made to work for security reasons, well, that’s that. If it could be made to work, though, then it (or something similar) would be very convenient!
If mods allow that, they make all of LW hackable by you, by anyone who can guess your password, and by anyone who can hack your site at any point in the future. I think that’s way too much trust.
Yeah, fair point. Ok, back to the drawing board, I suppose!
Ah, no. The post has a bunch of custom HTML elements, such as slide galleries and tables and some special image formatting, which is indeed quite a challenge to implement.
Promoted to the frontpage.